
Agent开发之学习
Agent基础概念
Agent与传统程序的区别
传统程序与智能体程序的区别:
- 传统程序:输入固定的指令,输出固定的结果
- 智能体:更像一个拥有
思考能力的助手
传统程序的示例:计算器
1 | def calculator(a,b,operator): |
Agent智能体的示例:个人助手
1 | def personal_agent(user_input): |
Agent核心能力
感知引擎:像人类的眼睛耳朵
- 自然语言理解:
帮助我订一个酒店。动作:预定。对象:酒店。条件:低价。 - 多模态输入:
文本、语音、图像
- 自然语言理解:
决策大脑:像人类思考判断
- 基于
LLM的推理能力 - 根据选择的策略进行调用
API、搜索知识库等
- 基于
- 执行器官:像人类的手脚
API调用以获取实时数据工具执行操作外部系统输出生成的图像语音图像响应
- 示例如下:
1 | def make_decision(user_input): |
Agent技术演进
- 从
2016年的Siri到至今的Agents,技术栈大致经历了三次革新:
| 时代 | 核心技术 | 局限性 |
|---|---|---|
| 第一代 | 规则引擎+固定模版 | 只能处理预设问题 |
| 第二代 | NLP模型+意图识别 | 无法执行复杂操作 |
| 第三代 | LLM+工具调用+记忆系统 | 全能但需优化稳定性 |
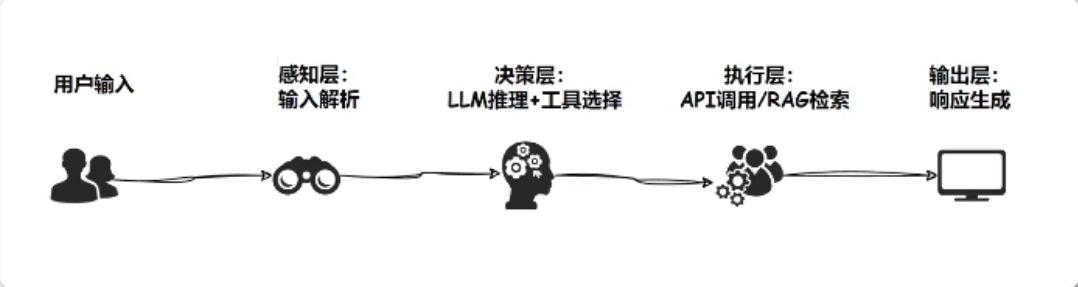
- 当前最先进的
Agent架构:
Agent应用场景与技术栈
Agent应用场景有:客服助手、数据分析家、个人效率管家- 现代
Agent开发四大支柱技术:- 大语言模型
LLM:大脑皮层- 主流选择:
GPT、Claude、llama3、Deepseek - 作用:理解、推理、内容生成
- 主流选择:
- 工具调用
Tool Calling - 记忆系统
Memory:- 短期记忆:对话上下文
- 长期记忆:用户偏好,知识库
- RAG
检索增强:外部知识连接器- 解决LLM知识静态性问题
- 实时获取最新信息
- 大语言模型
Agent与传统程序的再次对比分析:
1 | # 传统程序(固定流程) |
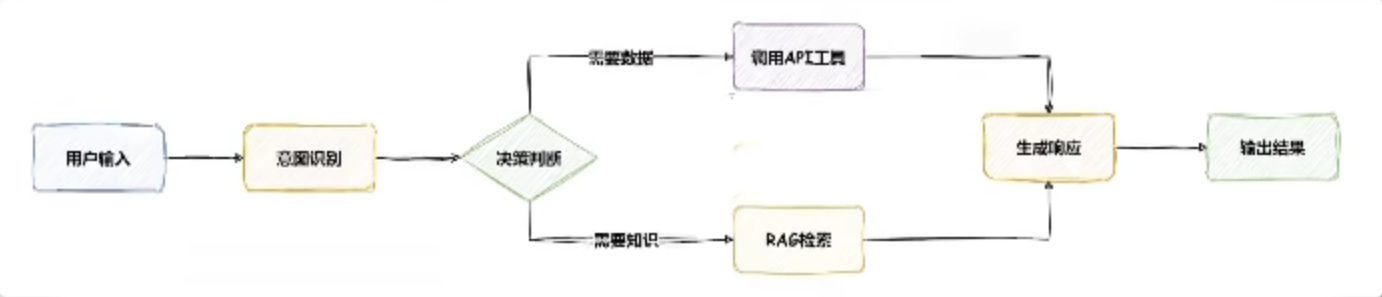
Agent工作流程
Agent常用技术之LLM
Agent常用技术之LangChain
LangChain初步理解
了解
LangChain的相关网站,LangChain中文网:LangChain中文网 - 跟着LangChain学AI开发LangChain介绍:LangChain是一个开源框架,简单来说,它帮助开发者更方便地构建基于大语言模型的智能应用。把它想象城一个工具箱,专门用来让Agent更聪明、更能干。它不是Agent本身,而是让Agent开发更顺手的工具集合。LangChain解决的是LLM的一些短板,让Agent能干更多事,比如:- 连接外部数据:LLL脑子里装的知识是静态的,
LangChain能让它查数据库、搜索网页、调用API,获取最新信息。 - 记东西:它能帮助
Agent记住对话上下文(短期记忆)或者用户偏好(长期记忆),让交互更个性化。 - 用工具:
LangChain让Agent能调用各种工具,比如计算器、天气API、甚至跑Python代码。 - 复杂任务拆解:它能把用户的大需求拆成小步骤,逐步搞定。
- 连接外部数据:LLL脑子里装的知识是静态的,
- 注解:
LangChain本质上是框架,也就是一个编程语言的包,主要支持Python和Node.js(TypeScript),所以我们一般就是使用Python或者Node.js作为编程语言进行开发
LangChain与Agent的关系:LangChain很想Agent的万能工具箱,但是没有那么万能,它提供了很多现成的模块,比如:- 链
Chain:把多个操作串起来,比如先理解用户意图,再查数据,最后生成答案。 - 工具
Tools:让Agent能用外部功能,比如搜索、计算、翻译。 - 记忆
Memory:存储对话历史或用户数据 - 检索
RAG:从知识库或网上抓取最新信息。
- 链
LangChain的局限:- 不是开箱即用:得开发者自己搭配合适的模块和LLM
- 性能依赖LLM:如果底层的LLM不够强,
LangChain再好也有限 - 复杂场景还得定制:比如超复杂的任务流,可能还得自己写代码
- 核心优势:无需重复造轮子,标准化开发流程。
LangChain环境搭建
- 了解完
LangChain的一些基本概念和功能之后接下来就是环境搭建了。直接使用Conda创建虚拟环境,在虚拟环境中下载LangChain的这个包,以通义千问为例子。 - 创建虚拟环境:
1 | conda create -n agent_env python=3.12 |
- 安装
LangChain这里直接安装最新版:
1 | pip install langchain-community |
- 以及下载模型
API调用库:
1 | pip install dashscope==1.23.7 |
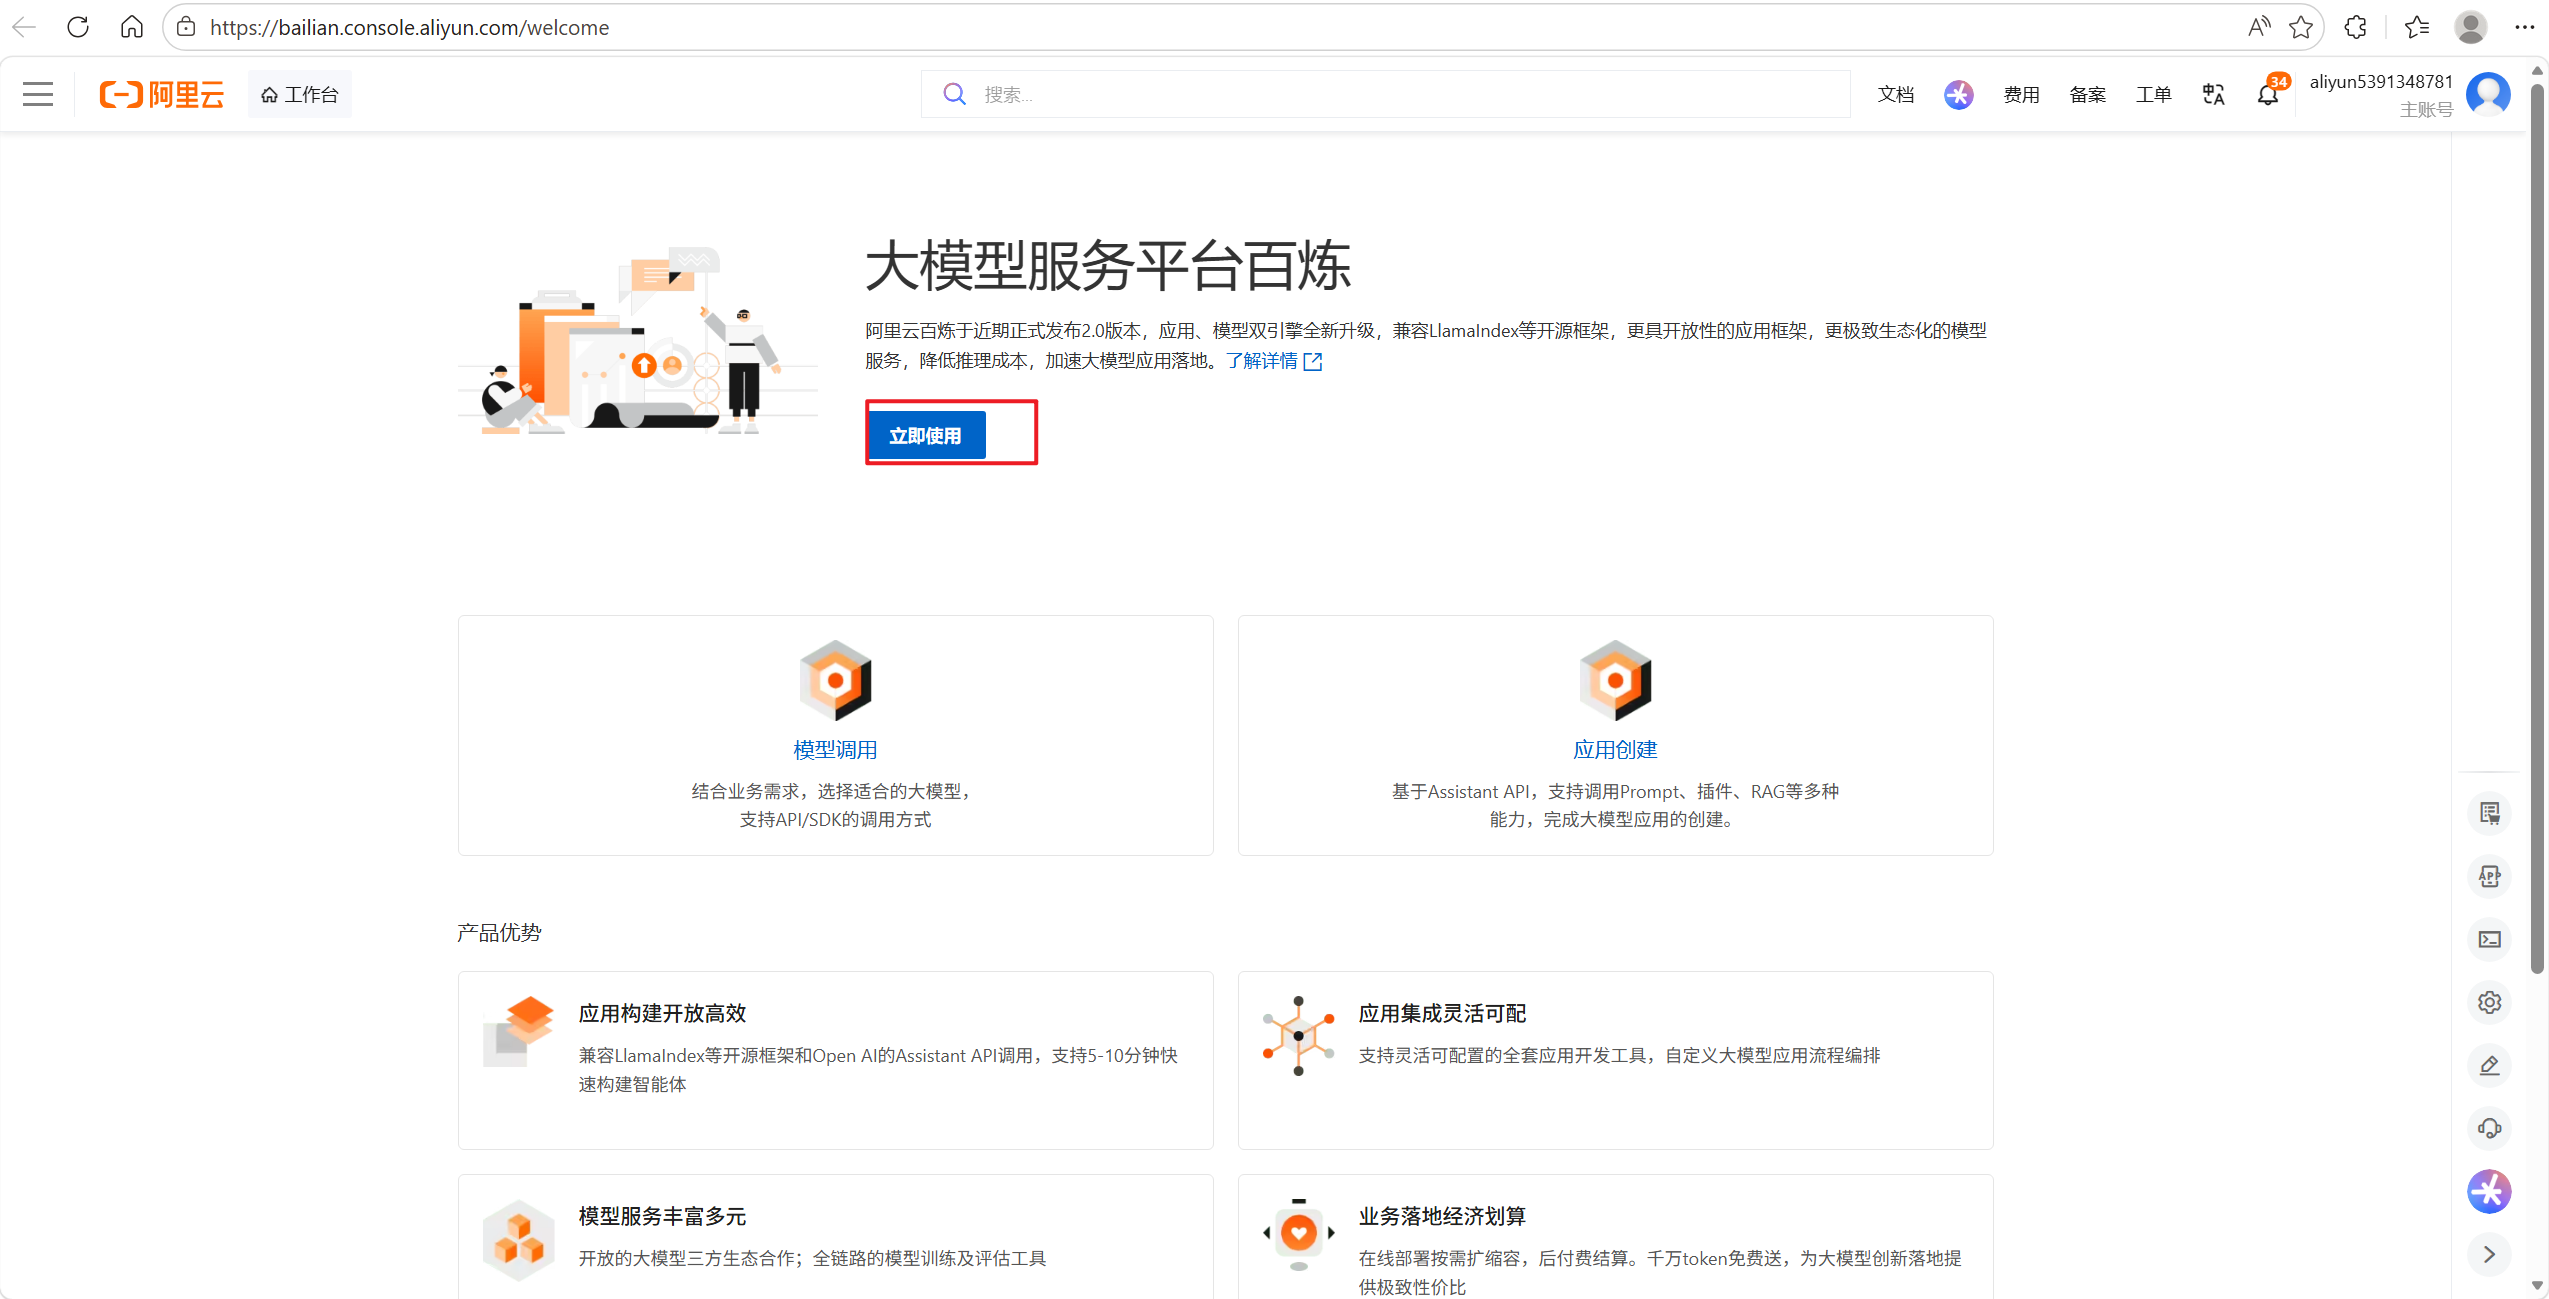
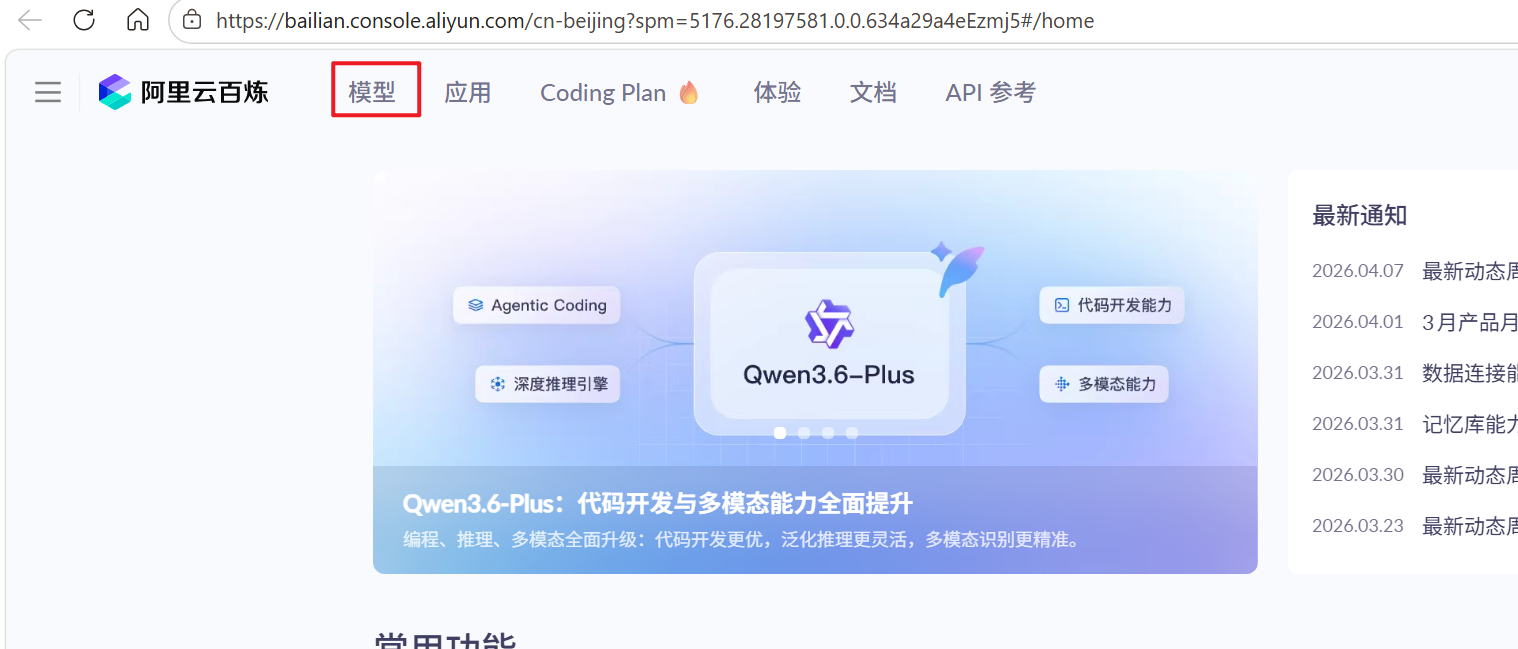
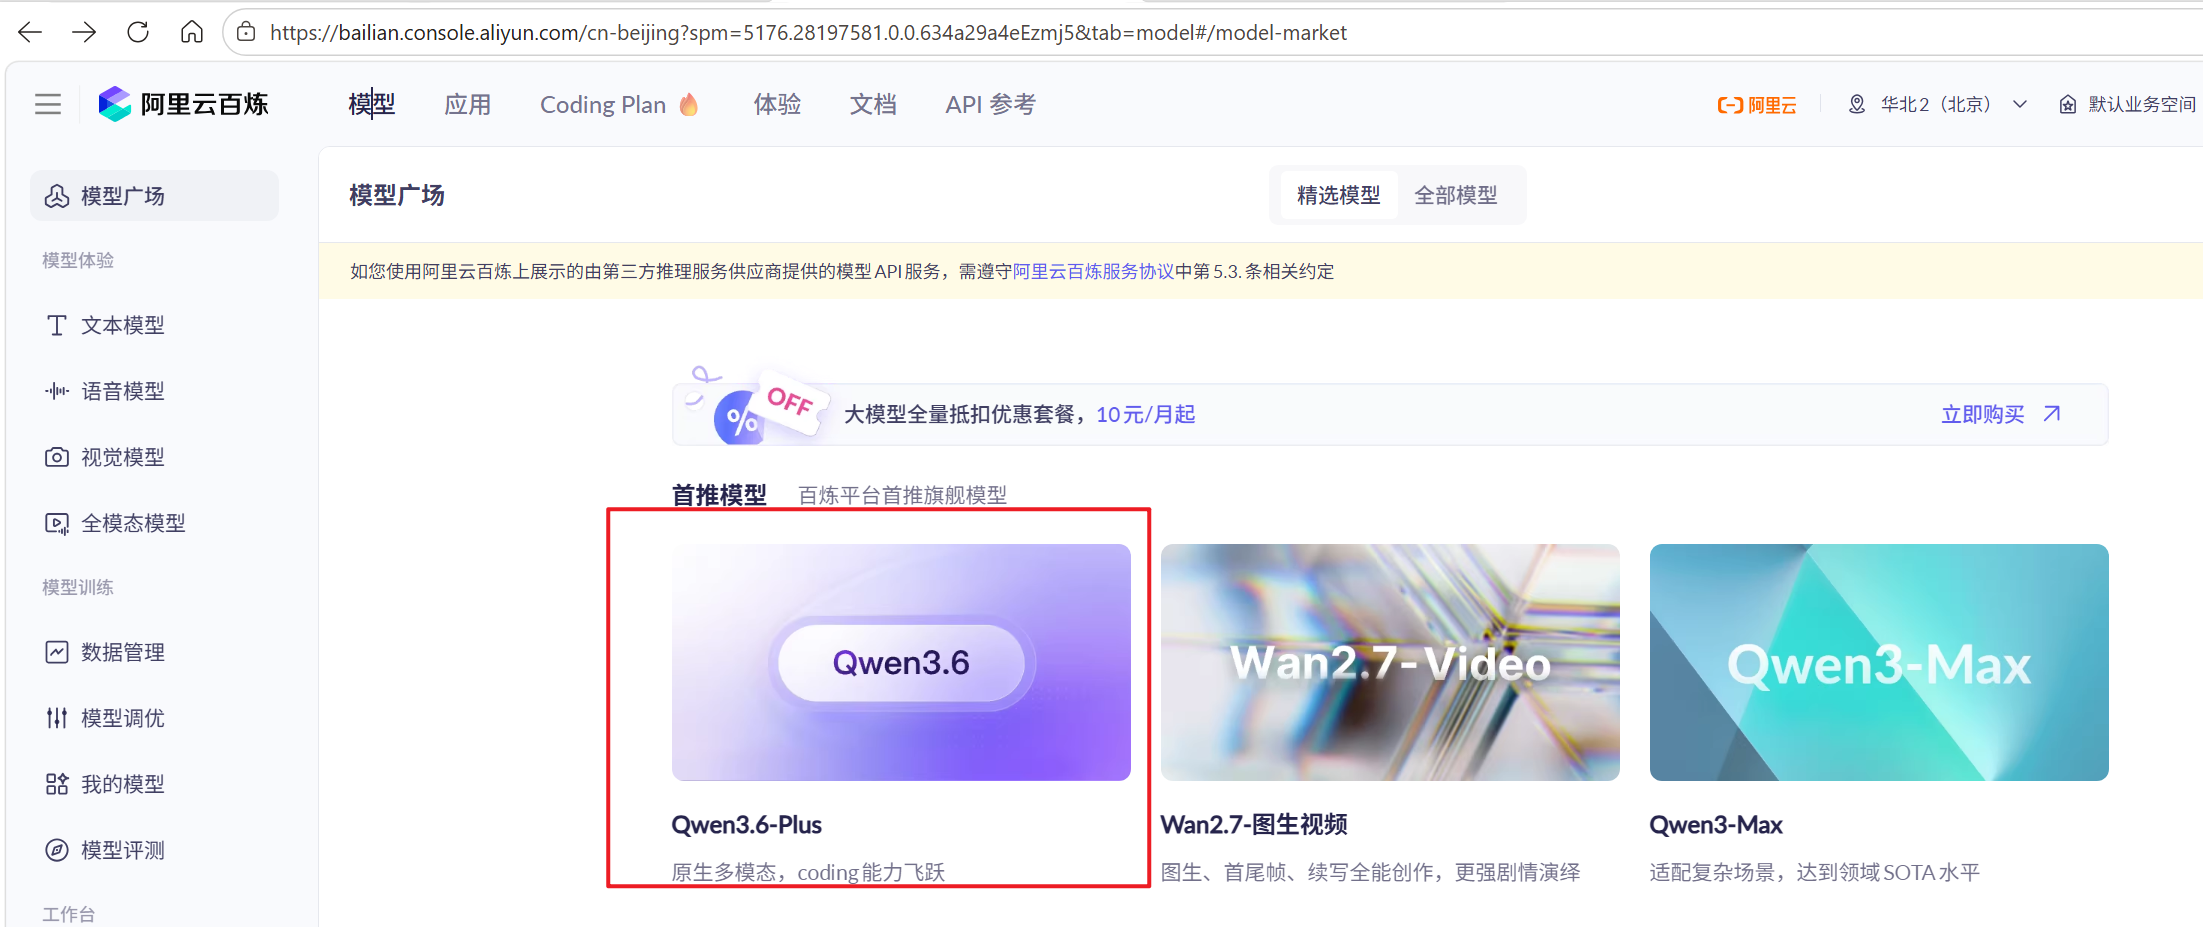
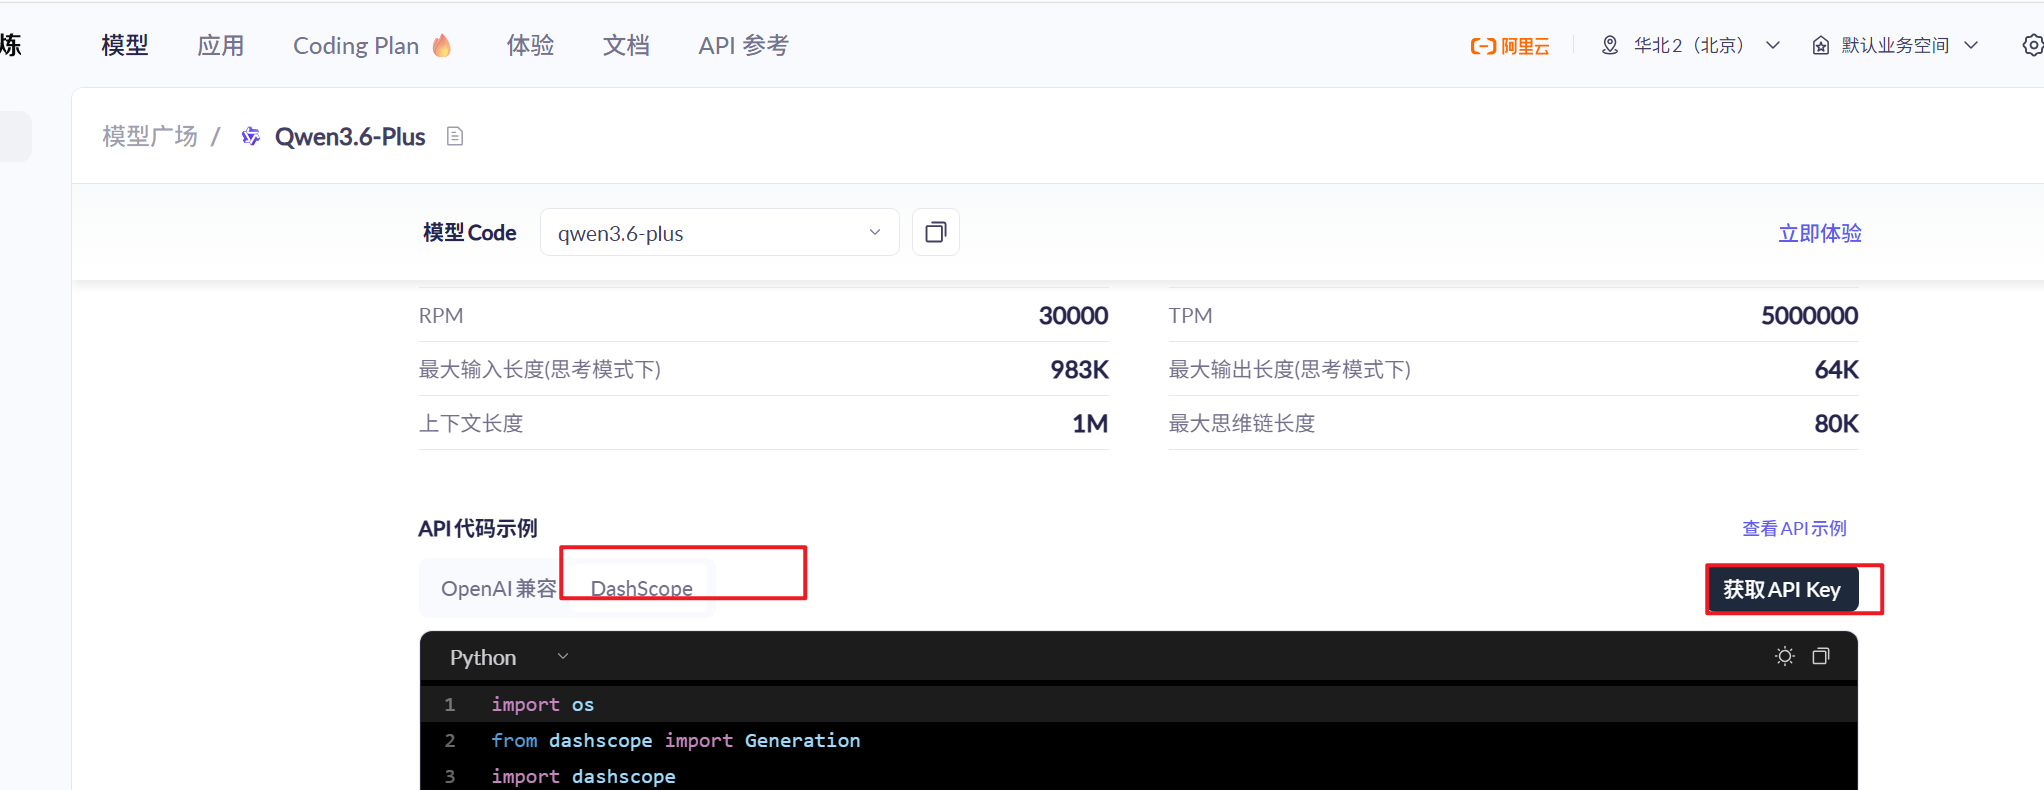
- 创建一个
LLM的API key:阿里云百炼
- 成功搭建环境后的小示例:
1 | from langchain_community.llms import tongyi |
LangChain类之提示词模版
LangChain的提示词模版引擎Prompt Template Engine是其核心组件之一,主要用于构建和管理打语音模型LLM交互的提示词Prompt。- 它的作用是将用户的输入或动态数据结构化地嵌入到预定义的模版中,从而生成适合模型处理的提示词,提升模型输出的准确性和一致性。
- 示例1:
- 使用一个模版定义提示词
- 使用
langchain_core.prompts的PromptTemplate中的format提示词替换 - 使用
langchain_core.prompts的PromptTemplate中的invoke提示词替换
1 | from langchain_community.llms import tongyi |
- 示例2:
- 使用多个句子定义提示词
- 使用
langchain_core.prompts中的ChatPromptTemplate中的format_message填充变量 - 使用
langchain_core.prompts中的ChatPromptTemplate中的invoke填充变量
1 | from langchain_community.llms import tongyi |
LangChain类之输出格式化
- 在
LangChain中,输出格式化Output Parsing是关键功能之一,用于将大语言模型LLM的原始输出通常是自由格式的文本,解析为结构化的数据格式,如JSON、字典或自定义对象。这不仅便于后续处理,还能提高输出的可读性和一致性。 LangChain输出的格式化要注意两个地方:- 首先就是
langchain中output_parsers库的StructuredOutputParser,ResponseSchema这两个类已经被弃用了,所以不支持这个输出格式化方式 - 现在推荐使用的是
langchain中output_parsers库的PydanticOutputParser进行输出格式化
- 首先就是
示例如下:
1 | from langchain_core.output_parsers import PydanticOutputParser |
LangChain类之链式调用
- 在
LangChain中,LLMchain是一个核心对象,用于实现大语言模型的链式调用。它将提示词模版、语言模型以及可选的输出解析器组合在一起,形成了一个可重复执行的流程,简化了与LLM的交互。 - LLLChain的核心组件:
PromptTemplate- 定义提示词模版,包含占位符,如
{input},用于动态生成提示词 - 示例:
请用{style}风格解释:{question}
- 定义提示词模版,包含占位符,如
LLM:大语言模型,负责根据提示词生成输出OutputParser(可选):用于将LLM的原始文本输出解析为结构化格式如json格式Memory:可集成上下文记忆,支持对话历史管理
注意:
langchain.chains中的LLMChain在新版的LangChain已经不能使用了,需要使用|也就是管道输出符号进行链式调用的定义示例如下:
1 | from langchain_community.llms import tongyi |
LangChain类之流式输出
- 流式输出是指在用户输入问题后,
AI模型边生成边显示响应内容,逐步展示AI的思考过程,而不是等待所有内容生成完毕后再一次返回完整答案。 - 与传统非流式输出相比,流式输出的差异如下表所示:
| 模式 | 特定 |
|---|---|
| 普通输出(非流式) | 用户提交问题$\rightarrow$等待几秒$\rightarrow$一次性返回完整答案 |
| 流式输出 | 用户提交问题$\rightarrow$AI边生成边显示$\rightarrow$逐步输出答案 |
- 示例如下:
1 | from langchain_community.llms import tongyi |
Langchain记忆系统
- 与LLM对话系统中,每次交互
调用API都是处理无状态的处理,导致对话缺乏连贯性。LangChain的记忆系统通过以下方式解决这个问题。
注意:
- 虽然目前看到许多聊天机器人都是由记忆的,是因为借助了代码的帮助,提供了历史消息作为和LLM对话的上下文。
- 所以就可以基于之前说过的会话内容,再生成新的内容。从而感觉好像
记得说过的话
- 记忆系统的作用:
- 上下文的保证:记住用户之前的输入和系统的输出
- 个性化交互:存储用户偏好和关键信息
- 长期学习:积累历史交互数据用于改进后续响应
注意:随着历史内容的变多,
tokens的数量也会变多,而平台的计费方式往往是通过tokens的数量来计算的。
LangChain中记忆系统有以下这些:ConversationBufferMemory缓冲记忆ConversationBufferWindowMemory窗口记忆ConversationTokenBufferMemoryToken限制记忆ConversationSummaryMemory摘要记忆ConversationSummaryBufferMemory摘要 + 原始混合ConversationEntityMemory实体记忆CombinedMemory组合记忆VectorStoreRetrieverMemory向量数据库记忆
- 但是在
Langchain v1版本中上面这些已经被移除了,所以这块不学了。 - 在
Langchain v1中出现了三种记忆代替方案:- 短期记忆:使用的是
messages - 长期记忆:使用的是
向量库+检索 - 复杂记忆:使用的是
LangGraph
- 短期记忆:使用的是
短期记忆
- 短期记忆直接看官方文档来:短期记忆 | LangChain 中文文档
LangChain文本嵌入模型
文本嵌入大致介绍:
- 文本嵌入是将文本转换为固定长度的数值向量表示
- 这些向量捕捉文本的语义信息,相似语义的文本在向量空间中距离较近
- 例如:
Hi there!和Oh, Hello!的向量相似度高What's your name?和My friends call me world的向量相似度低
- 计算机对自然语言理解不够,但是可以处理数字,通过这些向量,电脑就能理解文字的含义
可以使用文本嵌入做如下事情:
- 找相似的内容:让计算机明白哪些文字意思解决,比如搜索的时候不只是找关键词,电脑就能理解文字的含义
- 分类文字:比如看一条评论是好评还是差评,电脑通过向量就能判断
- 推荐东西:像推荐文章、电影,基于内容的意思来推荐,而不是盲目推荐
- 跨语言:中文、英文都能够转成向量,意思相近的还能凑一块儿。
- 示例如下:
1 | # 网络版文本嵌入模块 |
LangChain工具封装
- LangChain工具调用原因:
- 解决LLM的局限性:大语言模型存在
幻觉问题,且无法直接访问实时数据或执行具体操作 - 扩展能力边界:通过工具集成,
Agent可以获得计算、API访问、数据库查询等实际能力 - 模块化设计:将不同功能封装为独立工具,便于维护和复用
- 解决LLM的局限性:大语言模型存在
LangChain工具开发核心组件
@tool装饰器:- 用于将普通
python函数转换为Langchain工具 - 自动生成
JSON Schema,描述工具的输入参数和输出参数,
- 用于将普通
示例如下:
1 | from langchain.tools import tool |
JSON Schema的规范如下:- 工具的输入参数需要明确类型,如
str、int - 文档字符串
docstring描述工具功能,Agent依靠此判断是否调用
- 工具的输入参数需要明确类型,如
JSON Schema的示例如下:
1 | { |
Agent实战
实战1——天气查询工具
- 案例背景:
- 目标:开发一个天气查询工具,供
Agent调用 - 数据源:
APISpace(免费,需注册获取API key) - 功能:输入城市名,返回实时温度和天气状况
- 目标:开发一个天气查询工具,供
环境准备:
- 安装依赖1:
pip install requests - 安装依赖2:
pip install pandas - 注册账户,获取
API key:APISpace-API数据接口-API接口大全-免费API接口服务
- 安装依赖1:
工具实现代码:
1 | import requests |
实战2——调用工具
LangChain工具调用机制:LangChain通过@tool装饰器将Python函数转换为Agent可调用的工具- 工具定义遵循
Json Schema规范,确保结构化输入与输出 Agent通过提示词Prompt决定合适调用哪个工具- 流程如下:
- 用户输入,
Agent解析意图 - 匹配工具,执行函数
- 返回结果,整合到
Agent响应
- 用户输入,
- 示例如下:
1 | from langchain.agents import create_agent |
RAG索引增强生成
RAG英文全称为Retrieval-Augmented Generation,检索增强生成是一种将信息检索和文本生成相结合的AI技术。例如,我们向LLM提问一个问题,RAG从各种数据源检索相关信息,并将检索到的信息和问题注入到LLM提示中,LLM最后给出答案。- 出现
RAG的原因:当我们将大模型应用于实际业务场景时就会发现,通用的基础大模型基本无法满足我们的实际业务需求,主要有以下几个方面:- 知识的局限性:模型自身的知识完全源于它的训练数据,而现有的主流大模型基本都源于网络公开的数据,对于一些实时性的、非公开的或离线的数据是无法获取到的。这部分知识也就无从具备。
- 幻觉问题:所有
AI模型的核心基于数学概率,输出本质是一系列数值运算,大模型也不例外。因此,在知识欠缺或不擅长的领域,大模型可能一本正经地输出错误信息。这种幻觉问题难以辨别,因为它要求使用者具备相关领域知识。 - 数据安全性:对于企业而言,数据安全至关重要,没有企业原因冒着数据泄露风险将私域数据上传至第三方平台进行训练。因此,完全依赖通用大模型的应用方案往往需在数据安全与效果之间权衡。
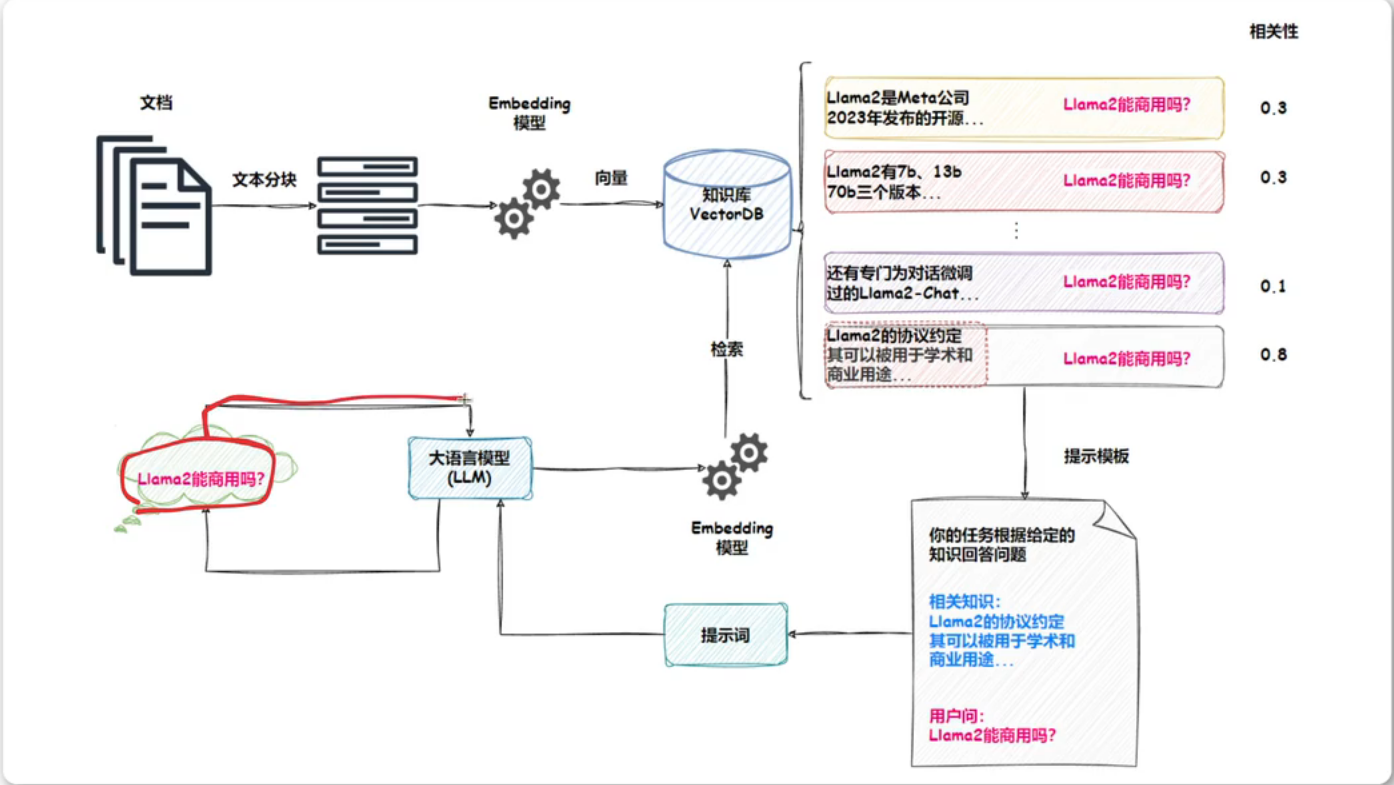
RAG的工作原理如下:- 核心思想在LLM回答用户问题之前,先进行一次信息检索。这个过程通常分为以下几个主要步骤
- 用户查询
- 知识库
- 检索
- 增强提示词
- 生成
- 想像你是一名学生,需要回答一道复杂的历史问题。
- 没有RAG:你只能凭借记忆回答,如果问题超出了你的记忆范围,你可能会胡编乱造
- 有了RAG:你会先去图书馆,查找相关历史书籍,然后阅读书中的相关章节,最后结合自己的理解来回答问题。
- 核心思想在LLM回答用户问题之前,先进行一次信息检索。这个过程通常分为以下几个主要步骤
- RAG原理图片如下:
RAG系统搭建流程
- RAG搭建流程如下:
- 收集数据
- 数据分块
- 选择文本嵌入模型
- 初始化向量数据库
- 存储向量
- 整合大语言模型
- 示例如下:
本博客所有文章除特别声明外,均采用 CC BY-NC-SA 4.0 许可协议。转载请注明来自 iyheart的博客!
 wechat