
Linux内核模块开发2
Linux内核模块补充知识
- 在正式编写内核模块第一个程序之前,还需要了解一些关于Linux内核的知识。包括如下:
- Linux内核模块与Linux用户程序的对比
- Linux内核模块的可用的函数
- Linux内核空间与用户空间
- Linux内核模块的命名空间与Linux的代码空间(虚拟内存在内核和进程上的体现)
- Linux内核模块最常见的一类
设备驱动程序相关的介绍
内核模块与用户程序对比
- 用户程序:
- 用户程序启动一般是从
start->libc_start_main->libc_start_call_main->main这样的一个启动流程 - 用户程序结束一般是执行完
main函数之后返回到libc_start_call_main这边再调用exit函数从而结束一个进程的运行。 - 用户程序的库函数:用户程序使用的
printf()等库函数都是需要进行系统调用这一步。库函数完全由用户空间运行,为系统调用提供一个方便的接口。
- 用户程序启动一般是从
- 内核模块:
- 内核模块的启动:一般就是从
init_module或者module_init指定的函数作为入口。这个入口函数会告诉内核模块提供了什么功能并进行设置然后返回,之后模块处于空闲状态,当内核需要用到该模块的代码时就会执行该模块的代码。 - 内核模块的结束:一般就是从
cleanup_module或者module_exit指定的函数作为结束。这个退出函数是撤销入口函数所做的一切,注销已注册的功能。注意:每个模块都必须同时拥有入口函数和出口函数 - 内核模块的函数:内核模块的符号在
insmod时解析,符号的定义来自内核本身,要查看导出的符号,可以查看/proc/kallsyms这个文件目录。注意:可以通过编写替换掉内核系统调用模块,这样用户程序在进行某个进行系统调用的时候执行的并不是正常的系统调用,而是被替换掉的,这种技术在rootkit和bootkit很常见;但是替换的目的也可以用于好的地方
- 内核模块的启动:一般就是从
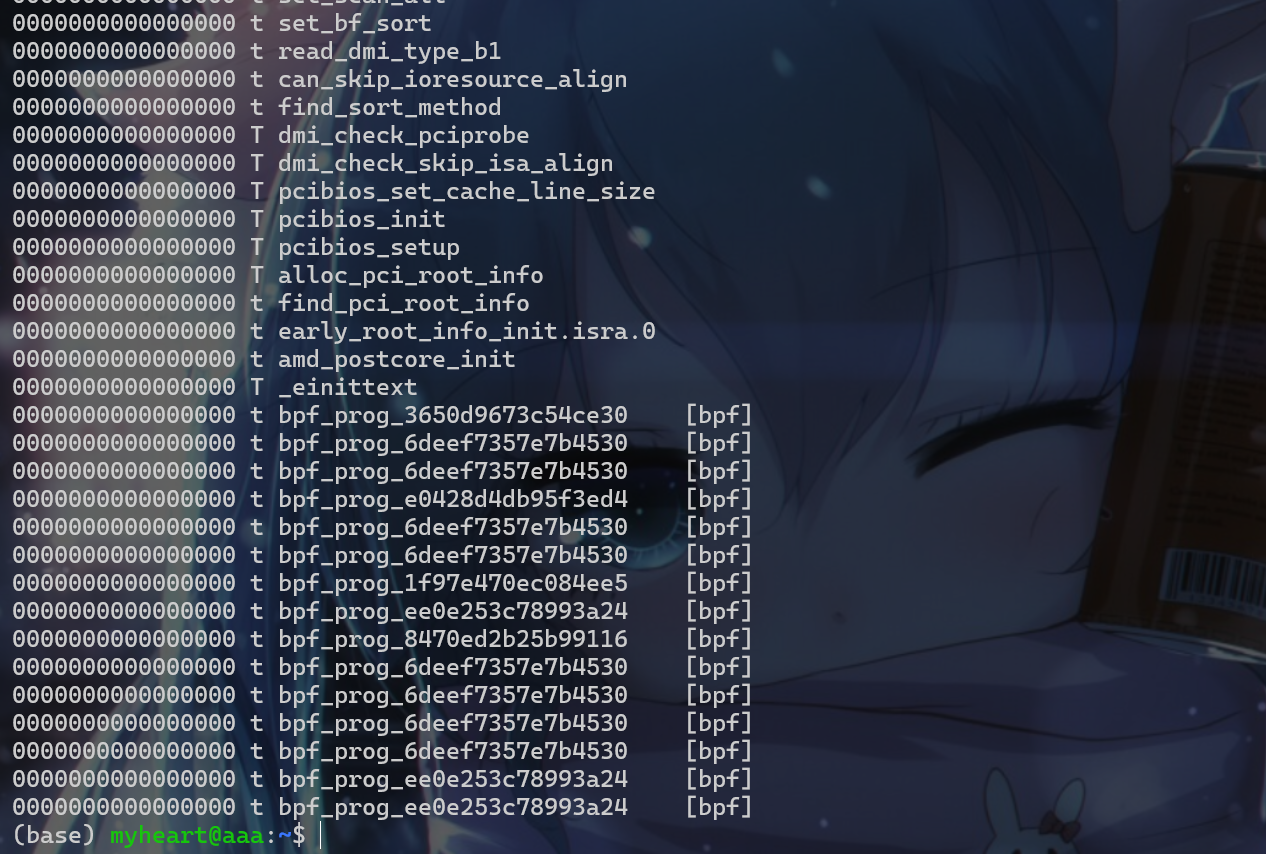
- 使用
cat /proc/kallsyms命令查看内核符号表:
内核模块可用函数
- 对于监控用户程序的系统调用情况,可以使用
strace命令对用户程序进行监控。
1 |
|
- 使用命令
strace ./test,就会显示如下输出,strace是用于跟踪一个进程执行过程中发生的系统调用和接收到的信号:

内核空间与用户空间
- 内核管理对硬件资源的访问,如显卡、硬盘和内存。CPU可以在不同的模式下运行,每种模式提供不同程度的自由度。其中
Intel 80386架构有4种这样的模式,称为环。Unix使用其中两种:环0即超级用户模式,允许一切操作;最低环即用户模式。
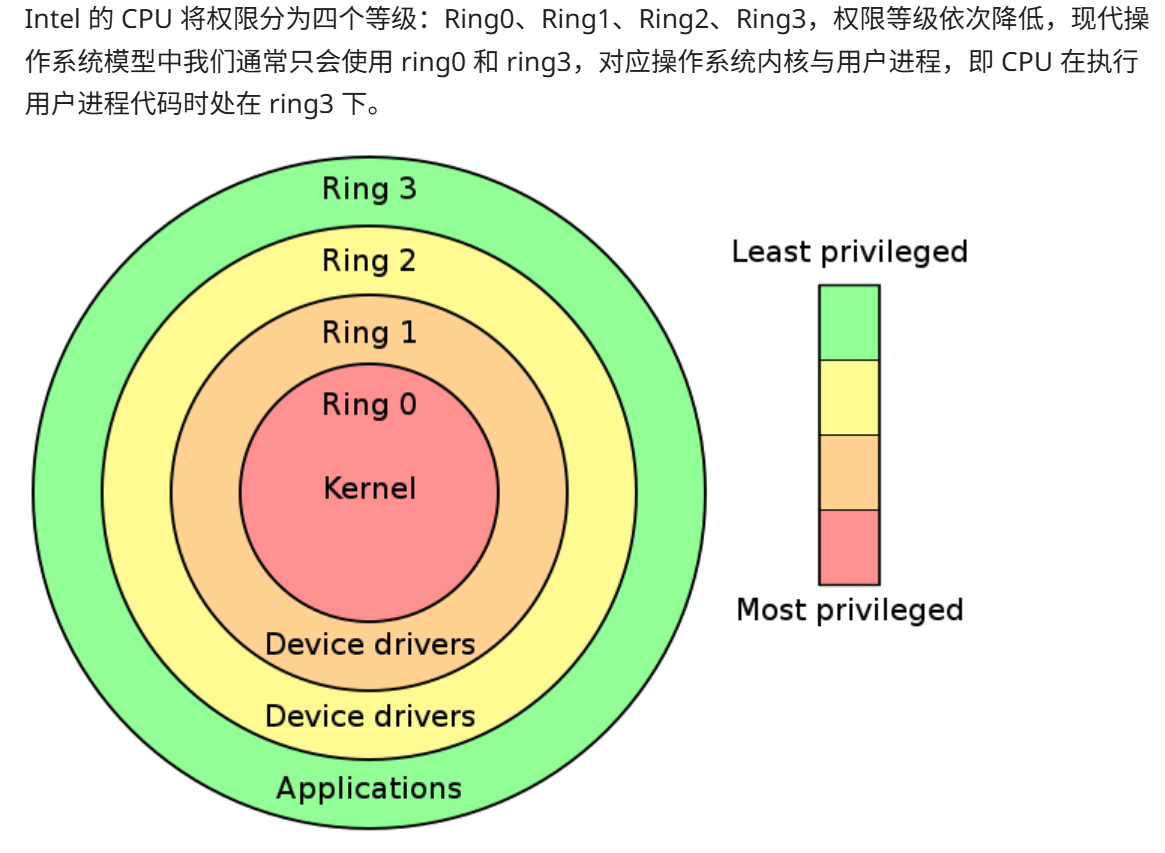
- 库函数在用户模式下运行,它们调用系统调用,系统调用作为内核的一部分在超级用户模式下执行。完成后,执行回到用户模式。
- 所以根据上面的介绍,可以给
用户态和内核态下一个定义:- 用户态:CPU 运行在 ring3 + 用户进程运行环境上下文。
- 内核态:CPU 运行在 ring0 + 内核代码运行环境上下文。
模块命名空间与代码空间
- 在小型
C程序中,变量名在局部范围内使用。但是对于大型C项目中的代码,全局变量可能会冲突。这个问题被称为命名空间污染。- 内核代码(即使是最小的模块)需要链接到整个内核,因此
命名空间污染需要非常重视。 - 最佳做法有下面两种:
- 将所有变量声明为
static并使用定义良好的小写前缀。 - 可以声明一个符号表将其注册到内核。
- 将所有变量声明为
- 内核代码(即使是最小的模块)需要链接到整个内核,因此
现代操作系统都有虚拟内存机制,并且对于国内操作系统课程来说,内存管理好像都是在讲
操作系统管理硬件的,似乎都没有讲操作系统对进程的内存管理。对于操作系统对进程的内存管理,学PWN的确实比较容易理解- 对于进程来说:
- 当进程被创建时,内核为其分配代码、变量、堆栈等所需的物理内存。这块内存从
0x00000000开始,并根据需要扩展。 - 但是因为虚拟内存机制,不同进程的内存空间不重叠,每个进程访问地址
0xdeadbeff的时候,实际上是访问不同的物理内存位置。也就是说每个进程的内存空间是相互独立的。并且进程通常不能访问另一个进程的空间。
- 当进程被创建时,内核为其分配代码、变量、堆栈等所需的物理内存。这块内存从
- 对于内核来说:
- 内核拥有自己的内存空间。由于模块是动态插入/移除的内核代码,它共享内核的代码空间,而不是拥有自己的空间。
- 因此,如果某个模块发生段错误,内核也会段错误,这就导致内核崩溃
在Windows上常见的是蓝屏。因此一个差错就会破坏内核数据或代码,这适用于任何具有单体内核的操作系统。 - 微内核则为模块提供了各自的代码空间。
- 对于进程来说:
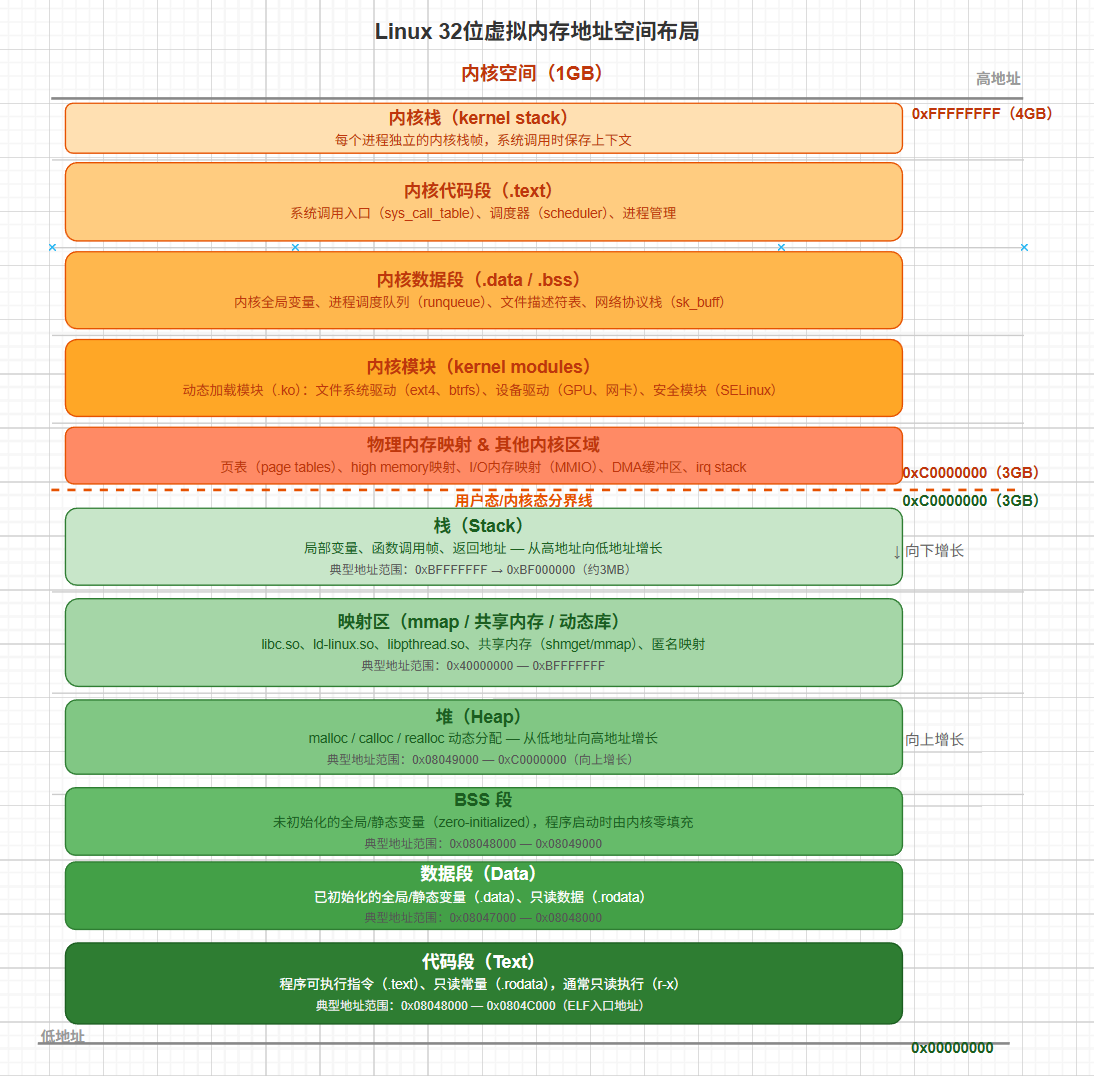
下面贴一张图表示虚拟内存代码的具体布局,从用户态到内核态,是
32位Linux下的:
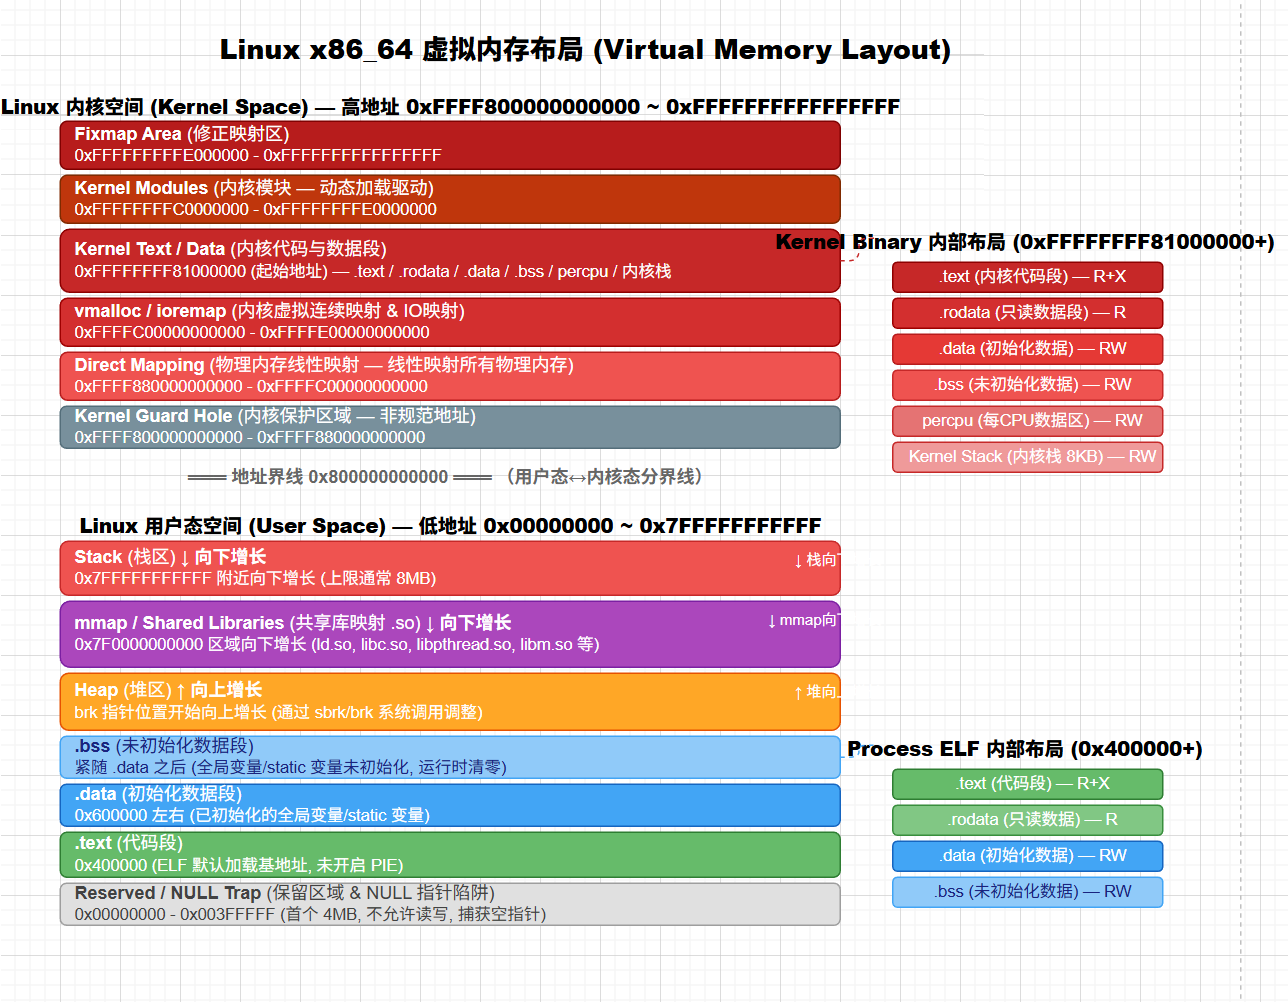
- 接下来这张图片是
64位Linux下的虚拟内存布局:
设备驱动程序
- 在Linux内核模块中,最常见的一种模块类型就是设备驱动程序,为迎接(如电视卡或串口)提供功能。
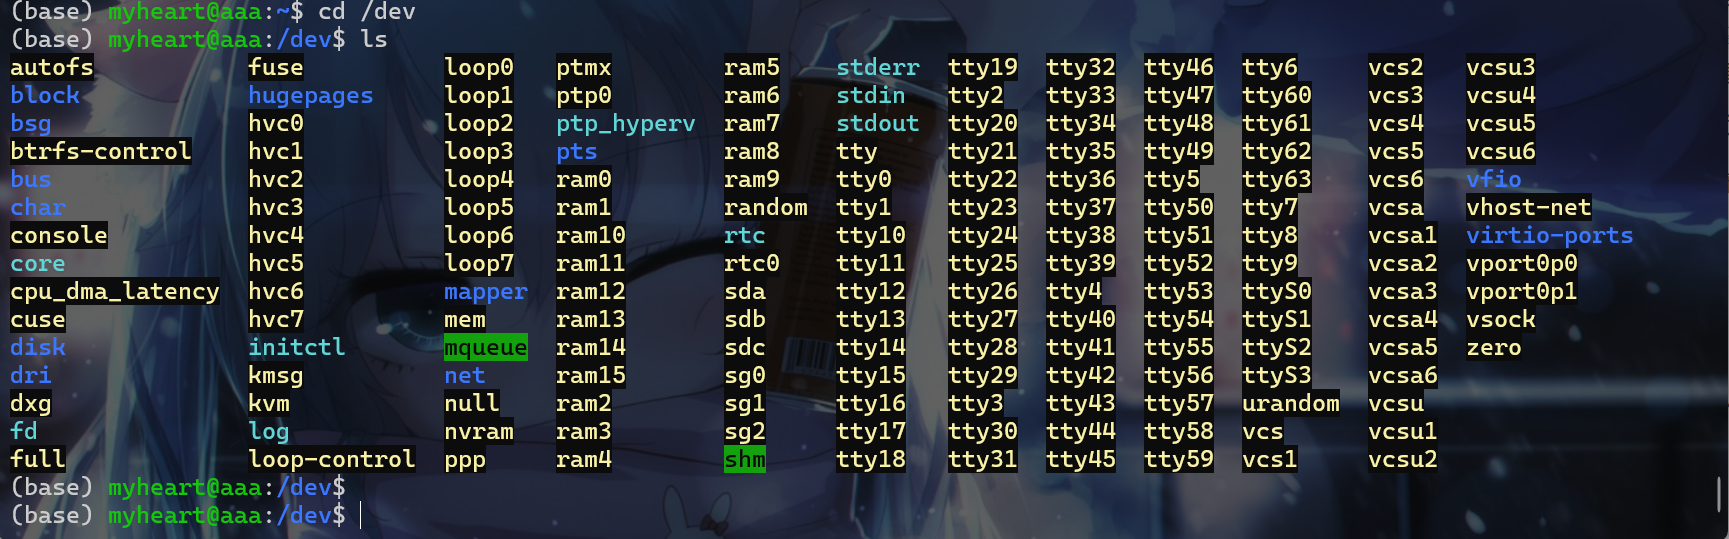
- 在
Unix上,每个硬件都由/dev目录中的一个称为设备文件的文件夹表示。
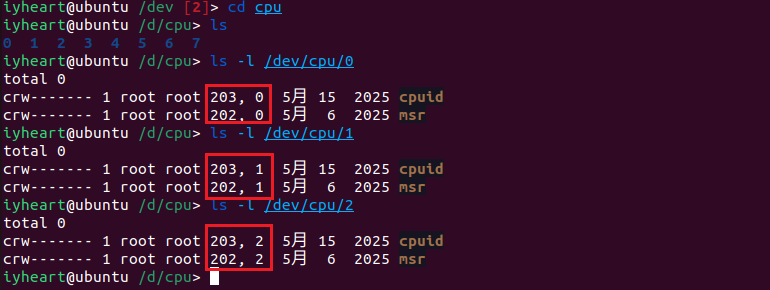
- 驱动程序有
主设备号以及次设备号,接下来以VM虚拟机中的/dev/cpu这个文件夹为例子,该虚拟机我定义了2个处理器,每个处理器4核,所以会出现如下:- 第一个数字
203、202是主设备号,表示处理此硬件的驱动程序。 - 第二给数字
0、1、2是次设备号,表示驱动程序用于区分不同的硬件。 - 注意:在这里应该算是两个驱动程序处理8个硬件,也就是
cpuid、msr这两个驱动程序处理0~8个CPU核
- 第一个数字
- 设备一般分为两种类型:
- 字符设备:
字符设备则根据需要使用任意数量的字节,大多数设备是字符设备。 - 块设备:
块设备有请求缓冲区,可以优化请求顺序,这对存储设备非常重要,因为连续读取/写入附近扇区更快。块设备以固定大小的块接受输入/输出 - 使用
ls -l输出中的第一个字符b表示块设备,c表示字符设备,标识了设备类型。上面的cpu就显示为字符设备。 - 已经分配的主设备号列表可以查看:
/usr/src/linux/Documentation/devices.txt
- 字符设备:
- 设备文件类型和普通文件类型是不一样的,所以不能使用
mkdir创建设备文件,要使用mknod创建一个设备文件。- 例如:要创建一个名为
coffee、主设备号为12、次设备号为2的新字符设备,就可以使用这样的一个命令:mknod /dev/coffee c 12 2 - 注意:一般设备文件都是放在
/dev这个目录下面的。 - 注意:在测试的时候,通常是在工作目录下面创建设备文件。
- 例如:要创建一个名为
- 在给设备文件命名的时候一般会标识硬件类型或是某种标号,比如下面:
- 下面这两种都是块设备,由同一个驱动程序处理,主设备号是
2都代表同一个软盘驱动器 - 其中一个软盘是标准的
1.44MB格式,另一个是超级格式化的1.68MB变体。
- 下面这两种都是块设备,由同一个驱动程序处理,主设备号是
1 | % ls -l /dev/fd0 /dev/fd0u1680 |
字符设备文件与驱动
- 补充了内核模块的一些相关知识后,接下来就开始写一个字符设备驱动程序。编写字符设备驱动程序的时候需要了解以下几点:
file_operations、file结构体注册设备与注销设备
file_operations结构体
file_operations结构体,该结构体定义在linux/fs.h中,包含指向驱动程序函数的指针:- 这些函数对设备会执行各种操作。
- 每个字段对应处理特定请求操作的驱动程序函数地址。
- 每个字符驱动程序都需要一个读函数,该结构体保存的都是函数地址,下面这个是在内核
5.15.1中的file_operations结构体:
1 | struct file_operations { |
注意:对于未实现的操作应将对应项设置为NULL,例如一个显卡驱动不会区读取目录。
对于给这些结构体元素进行赋值操作,可以有以下两种办法:
- 使用
GCC扩展允许在现代驱动程序中看到的比较方便的赋值风格:
1
2
3
4
5
6struct file_operations fops = {
read: device_read,
write: device_write,
open: device_open,
release: device_release
};- 使用
C99语法而非GNU扩展,建议使用这种语法,这种语法可移植性比较强。
1
2
3
4
5
6
struct file_operations fops = {
.read = device_read,
.write = device_write,
.open = device_open,
.release = device_release
};- 使用
对于任何未显式赋值的结构体成员都会被
gcc初始化为NULL。struct file_operations的实例通常命名为fops。
file结构体
- 每个设备在内核中由一个
file结构体表示,该结构体在linux/fs.h表示。这是内核级别的结构体,与glibc中的FILE不同。- 内核级别的
file结构体:- +
- 用户级别的
file结构体:- 有用户态的缓冲
glibc中的FILE通过int _fileno字段持有一个文件描述符,这个fd就是内核struct file在进程文件描述表中的索引。
- 内核级别的
- 下面是内核版本为
5.15.1版本file结构体:
1 | struct file { |
struct file的实例通常命名为filp,因此要避免使用struct file file这样的命名。- 大多数成员不直接由设备驱动程序使用,驱动程序只需使用在别处创建的
file结构体。
注册与注销设备
注册设备,字符设备通过设备文件,通常位于
/dev访问。- 主设备号标识哪个驱动程序处理该设备文件;次设备号在驱动程序内部区分不同的设备。
- 注册设备是通过
linux/fs.h中的register_chrdev完成:unsigned int major:请求的主设备号const char *name:设备名称,将显示在/proc/devices中struct file_operations *fops:指向驱动程序的file_operations表的指针。- 注意1:返回值如果是负数就表示注册失败。
- 注意2:次设备号没有被传入,内核不使用它,只有驱动程序需要。
- 注意3:传入
0作为主设备号会请求动态分配的主设备号,该主设备号会作为注册函数的返回值返回。这种方式分配的主设备号缺点就是无法提前创建设备文件。解决方案如下:- 驱动程序打印分配的号码,手动创建设备文件
- 设备出现在
/proc/devices中,使用shell脚本读取并创建文件。 - 驱动程序可以在注册后自行调用
mknod,在cleanup_module中调用rm。
1
int register_chrdev(unsigned int major, const char *name, struct file_operations *fops);
注销设备,在设备文件打开时一处内核模块会导致调用指向无效内存的位置,可能会跳转到另一个已加载的模块代码中,产生未定义行为或者直接段错误。
- 可以使用计数器跟踪有多少进程正在使用该模块(会在
/proc/modules的第三列中显示)。如果不为零,rmmod会失败。可以通过一下两个函数管理计数器:try_module_get(THIS_MODULE):增加使用计数。module_put(THIS_MODULE):减少使用计数。
- 检查在
sys_delete_module中自动进行,保持计数器的准确至关重要如果丢失,将永远无法卸载模块,这个时候就要重启电脑了。
- 可以使用计数器跟踪有多少进程正在使用该模块(会在
示例程序
接下来了解上面这几个之后,来创建一给示例程序来简单了解一下这个程序。该示例程序是一个名为
chardev的字符驱动程序。- 读取其设备文件会返回一条消息,显示该设备已经被读取的次数。
- 不支持写入设备的操作,如果进行写入设备的请求就会返回错误。
首先创建一个
chardev.h文件并写入如下内容:
1 |
|
- 接着创建一个
chardev.c文件并写入如下内容:
1 | /* |
- 接着将该模块移动到
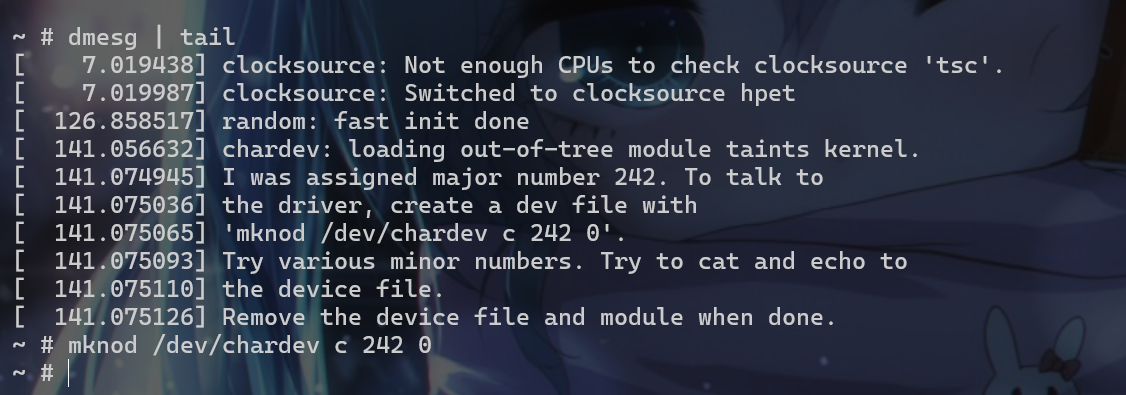
bosybox文件系统中,并进行打包,然后使用qemu进行模拟,并使用inmod命令加载模块。 - 接着使用
dmes | tail查看模块输出的信息,发现是init_module函数输出的信息

- 上面的信息告诉我们,如果要与该内核模块交互,我们先要使用
mknod /dev/chardev c 242 0在/dev目录下创建一个chardev的字符设备文件。
- 接下来我们对
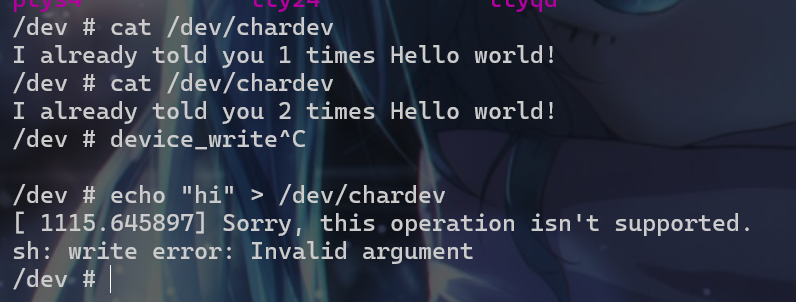
/dev/chardev这个文件的操作,就会调用相关的模块函数。这就揭示了Linux万物皆文件的思想,对模块的操作就是对文件的操作 - 先来使用
cat /dev/chardev命令,就会调用前面的device_open函数。

- 接着使用
echo "hi" > /dev/chardev命令就会出现如下现象,也就是调用device_write的结果。
本博客所有文章除特别声明外,均采用 CC BY-NC-SA 4.0 许可协议。转载请注明来自 iyheart的博客!
 wechat